I used to dodge servers like the plague. Too much ops bullshit. I just wanted to write code, so I lived on serverless and free platforms and called it a day.
Then I started seeing tech bros I admire self-hosting. Writing about it. Recommending it. Escaping the cloud. That got my attention. I wanted to run real stacks like PHP, Ruby, Elixir, not be boxed into JavaScript just because I was freeloading on Vercel and Cloudflare Pages.
I’m cheap, so even a dirt-cheap VPS felt like an unnecessary expense. Turns out that excuse was trash. Oracle Cloud gives you a legitimately powerful server for free, roughly what you’d pay hundreds a month for on AWS. That killed my last reason to procrastinate.
I signed up, grabbed the free VPS, and immediately hit the classic problem: where the hell do you even start?
Then I found a stupidly simple self-hosting setup on Twitter. Clicks, not pain. It felt like Vercel, but on my own box. No magic, no suffering. That’s when it clicked. The original post vanished into thin air, but my knowledge remains, so I’m gonna jot down on its behalf.
In this guide, I’ll show you how to grab a free Oracle Cloud VPS, set up Dokploy or Coolify, and deploy your own apps without losing your sanity.
Get your free lunch from Oracle Cloud
Go here and sign up for an OCI account. It will ask for a credit card (not debit/prepaid/virtual card so be prepared).
Upgrade to Pay as you go (PAYG) to reserve servers at any capacity on OCI. Your payment method must have at least $100 ready for verification. You won’t be charged if your usage stays within the free tier. A PAYG upgrade ensures server reservations and prevents idle servers from being taken down.
Check out https://www.oracle.com/cloud/free/ for free offerings within your quota. You can have 4 CPU, 24GB memory, and 200GB SSD across up to 4 VPS. Consolidate these specs into one VPS or create 4 with 6GB memory and 50GB SSD each, all for free. This is generous even compared to traditional VPS providers, let alone cloud.
Let’s create a VPS instance of any spec you prefer to move on to the next section. Go to https://cloud.oracle.com/compute/instances/create to create one. If you’re unsure about the settings, here are mine:
Look up common cloud-init scripts to set up your fresh instance after spinning up. They’ll apply basic hardening and security setup, so you can focus on other things. I use this one: https://gist.github.com/w3cj/cdd447b1a10ce741e4ee968fa6b75553.
A basic practice to secure your VM is to configure your VPS firewall to block all incoming connections except ports 80/443 and keep port 22 open to your home network. You can do this via Security List configuration in OCI’s Networking or using a Linux built-in package like ufw.
Make sure you can SSH into your VPS instance, and then we can move on to the next step!
Install your deployment PaaS of choice
Two popular choices are https://dokploy.com and https://coolify.io. You can’t go wrong with either. Install them by ssh’ing into your VPS and running a single command. Access the Dokploy/Coolify web page at the specified address (If you configured your firewall to block all ports except 80/443, temporarily disable it to access the web page and do initial setup until you can access it via domain name and reverse proxy).
I’m using Dokploy, so my content will be based on that. If you choose Coolify though the content should still be easy to follow. Let’s host Gatus, a simple uptime monitoring web app.
Self-host a Dockerized app
Log in, click on Projects > Create Project, fill in the information, and click on Create.
Go into the newly created project, click Create Service > Compose, and create a Docker compose yaml file to define your self-hosted app’s requirements.
Go to the newly created service. You’ll see several tabs with options, which may seem overwhelming. Let’s simplify this. In the General tab, select the Provider section and paste the yaml definition below into the editor:
services:
  gatus:
    image: twinproduction/gatus:latest
    volumes:
      - ../files/config:/config	# files mounted in Advanced tab are located under "files" folder
    restart: always
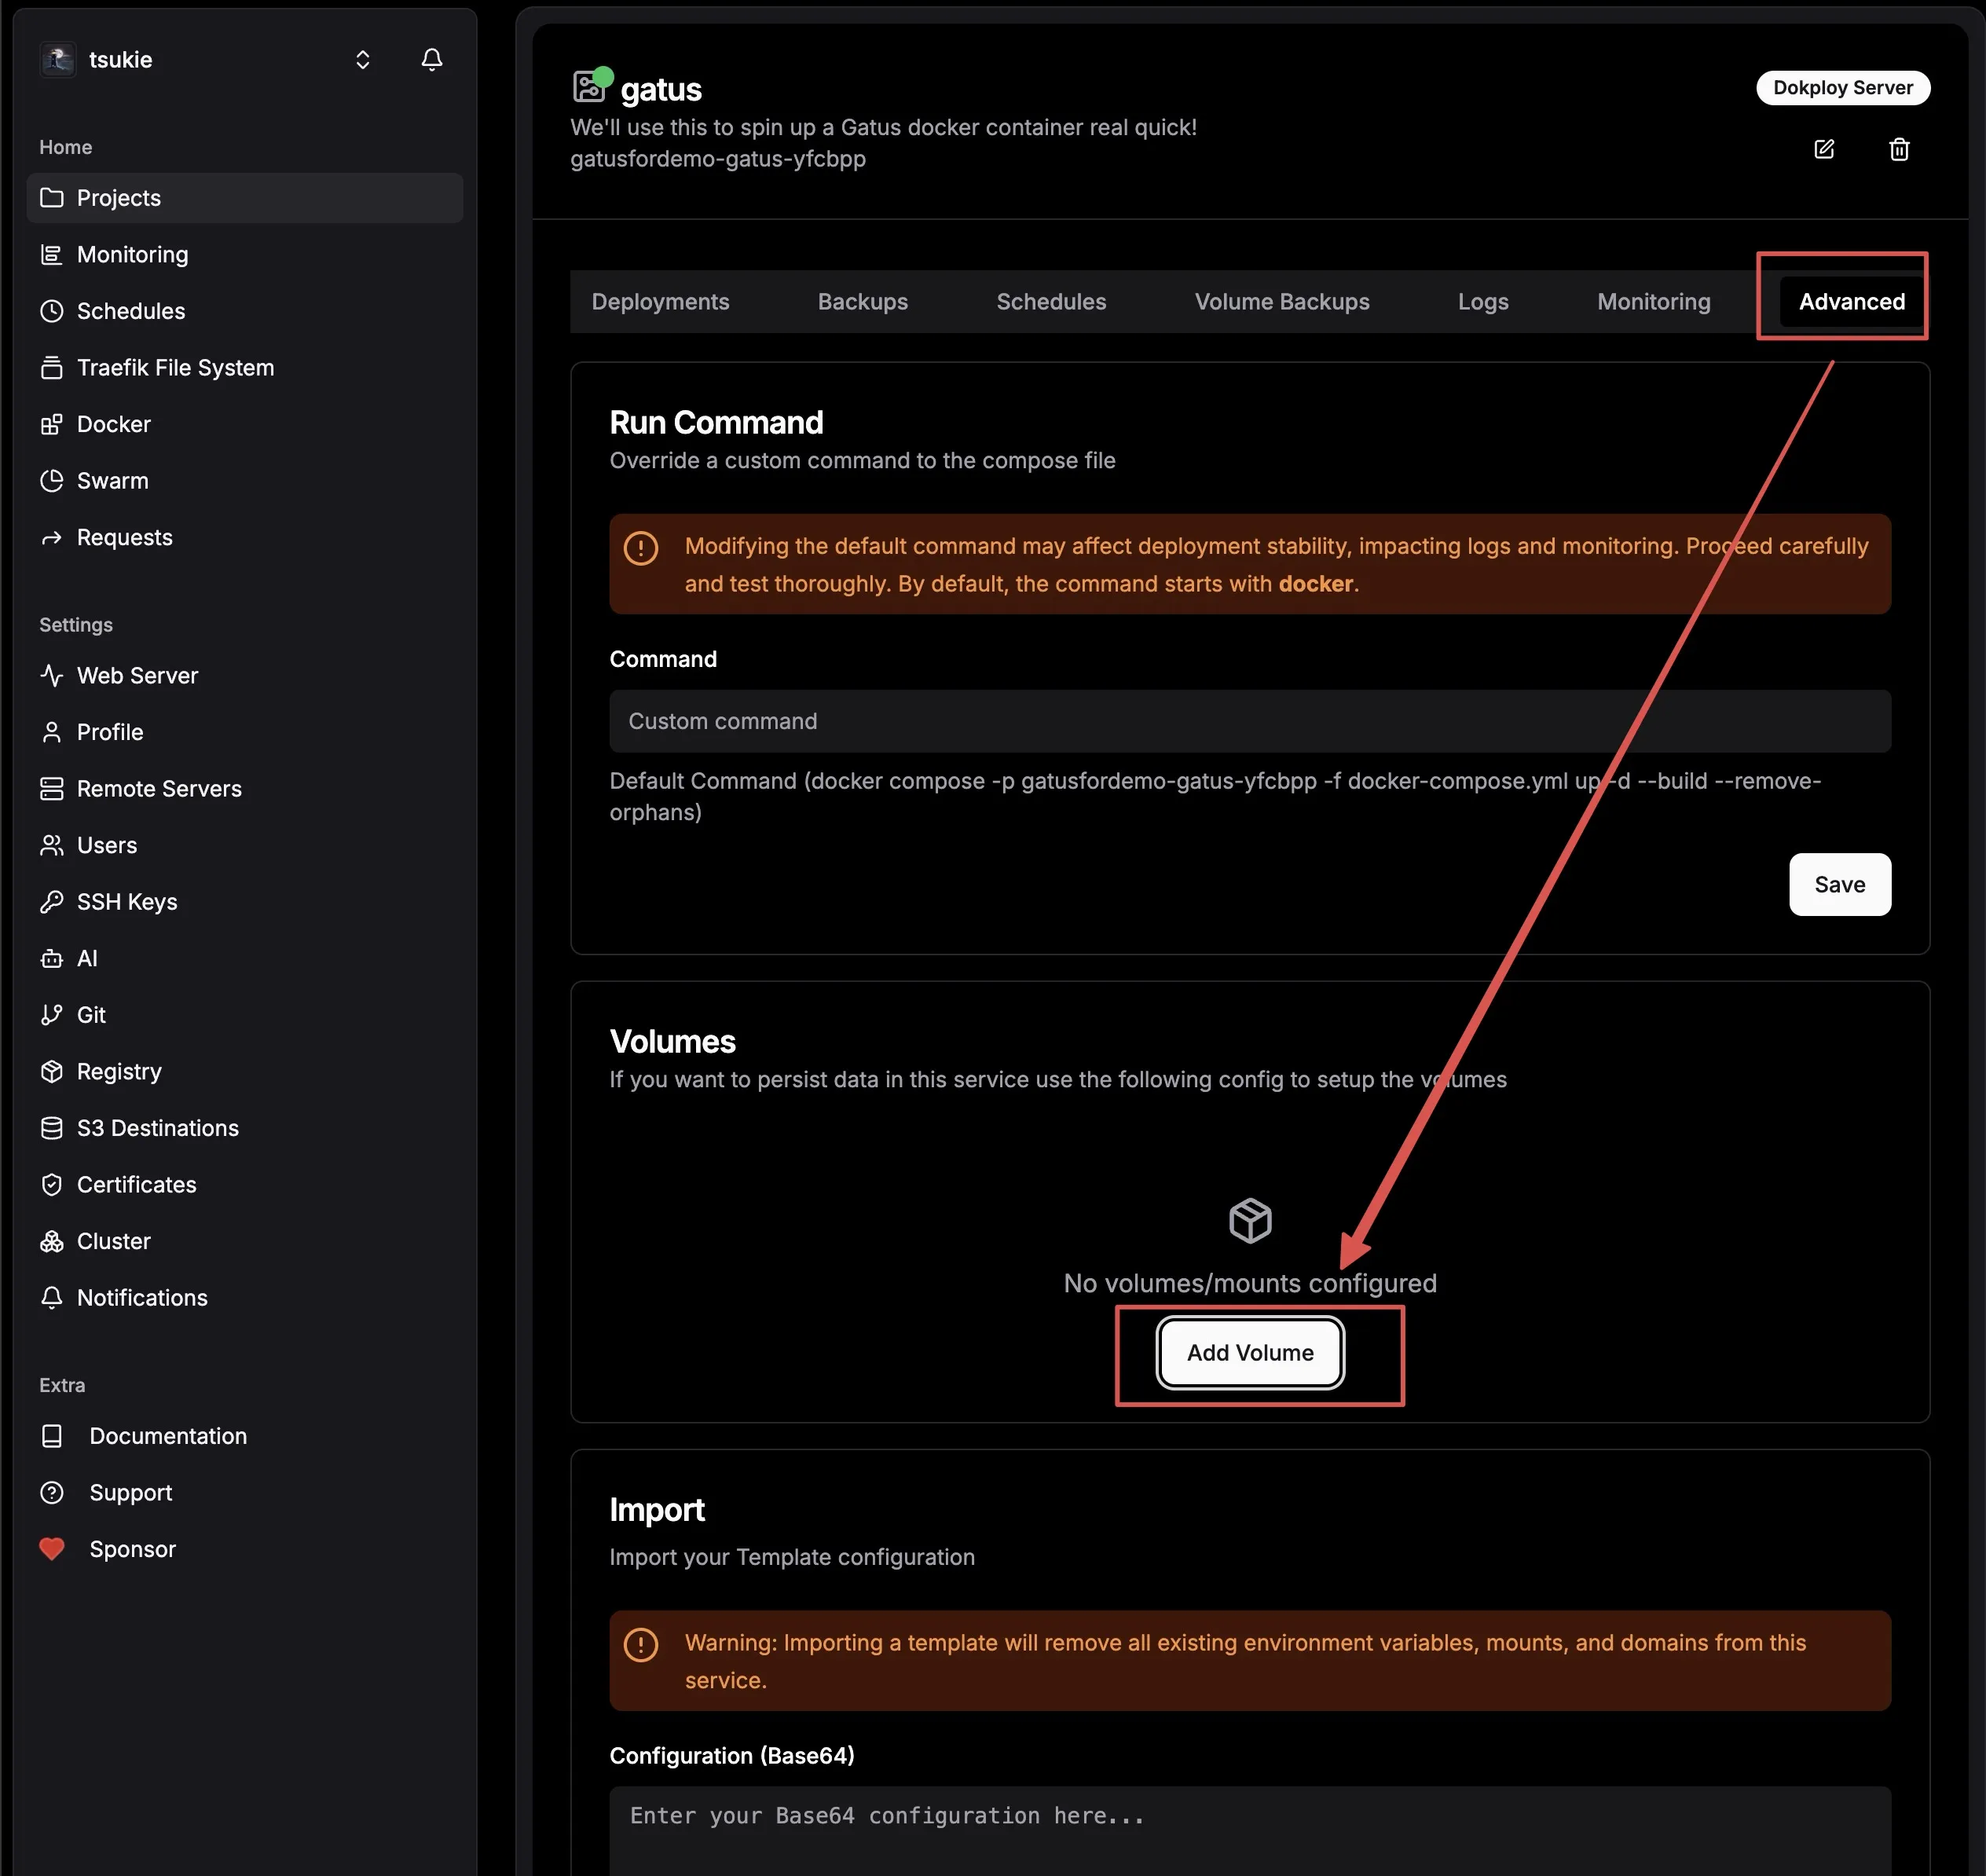
Also, mount the config file to the docker volume. Switch to the Advanced tab, click on Add Volume, and paste the code below into the editor:
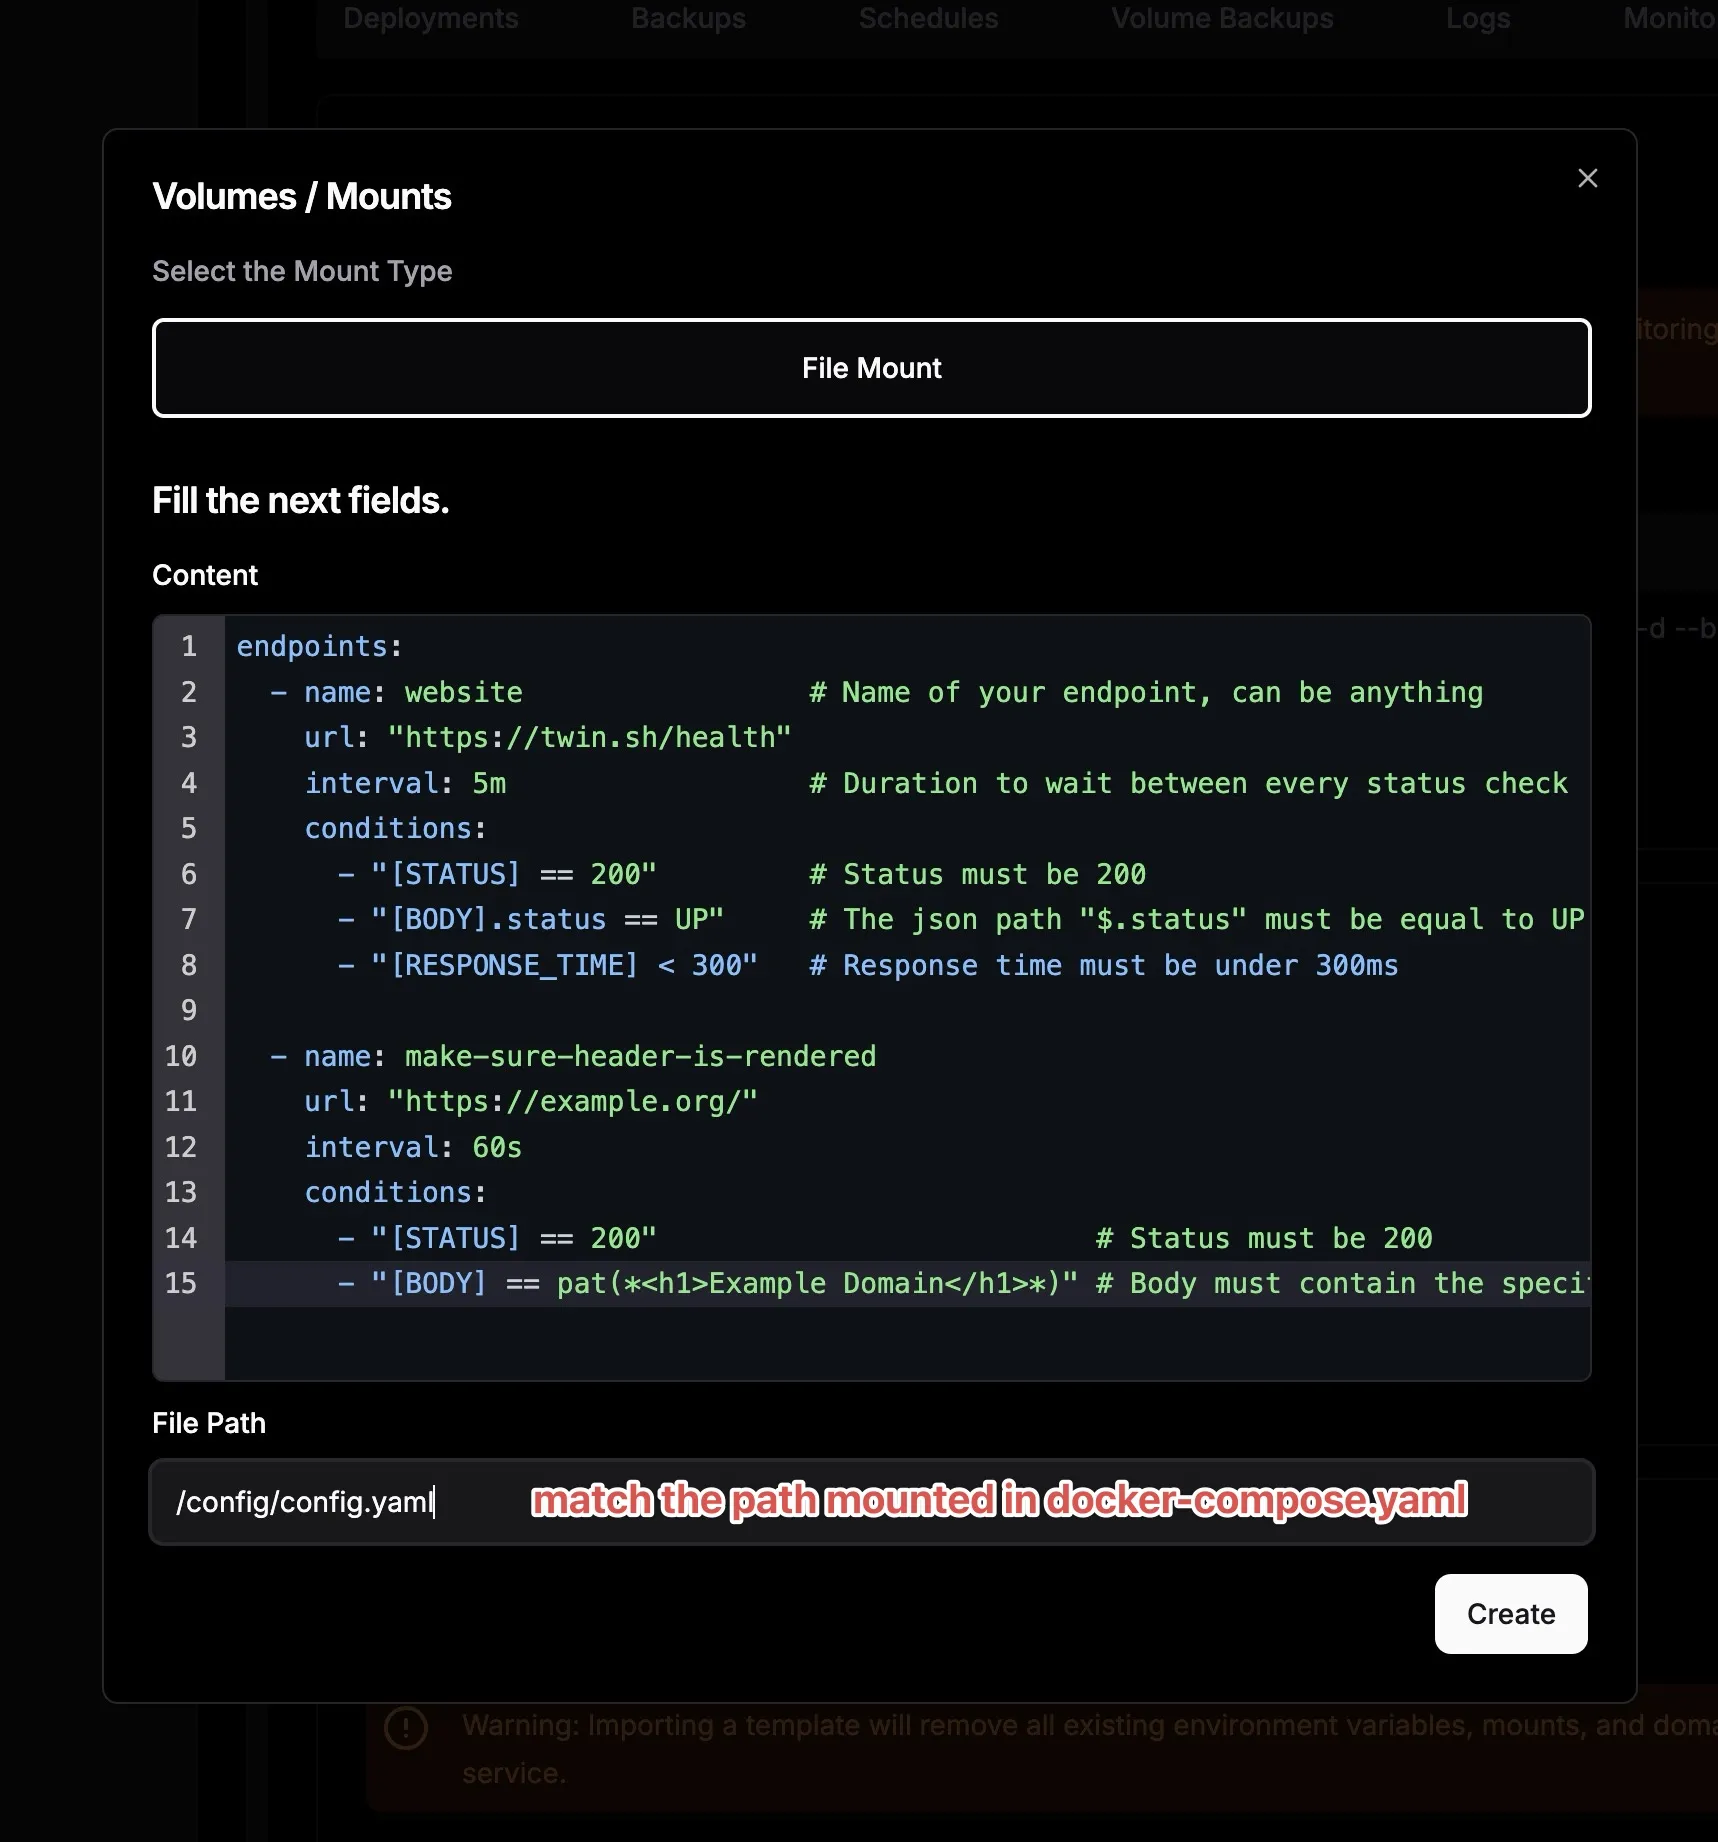
# Content to fill in
endpoints:
  - name: website                 # Name of your endpoint, can be anything
    url: "<https://twin.sh/health>"
    interval: 5m                  # Duration to wait between every status check (default: 60s)
    conditions:
      - "[STATUS] == 200"         # Status must be 200
      - "[BODY].status == UP"     # The json path "$.status" must be equal to UP
      - "[RESPONSE_TIME] < 300"   # Response time must be under 300ms

  - name: make-sure-header-is-rendered
    url: "<https://example.org/>"
    interval: 60s
    conditions:
      - "[STATUS] == 200"                          # Status must be 200
      - "[BODY] == pat(*<h1>Example Domain</h1>*)" # Body must contain the specified header
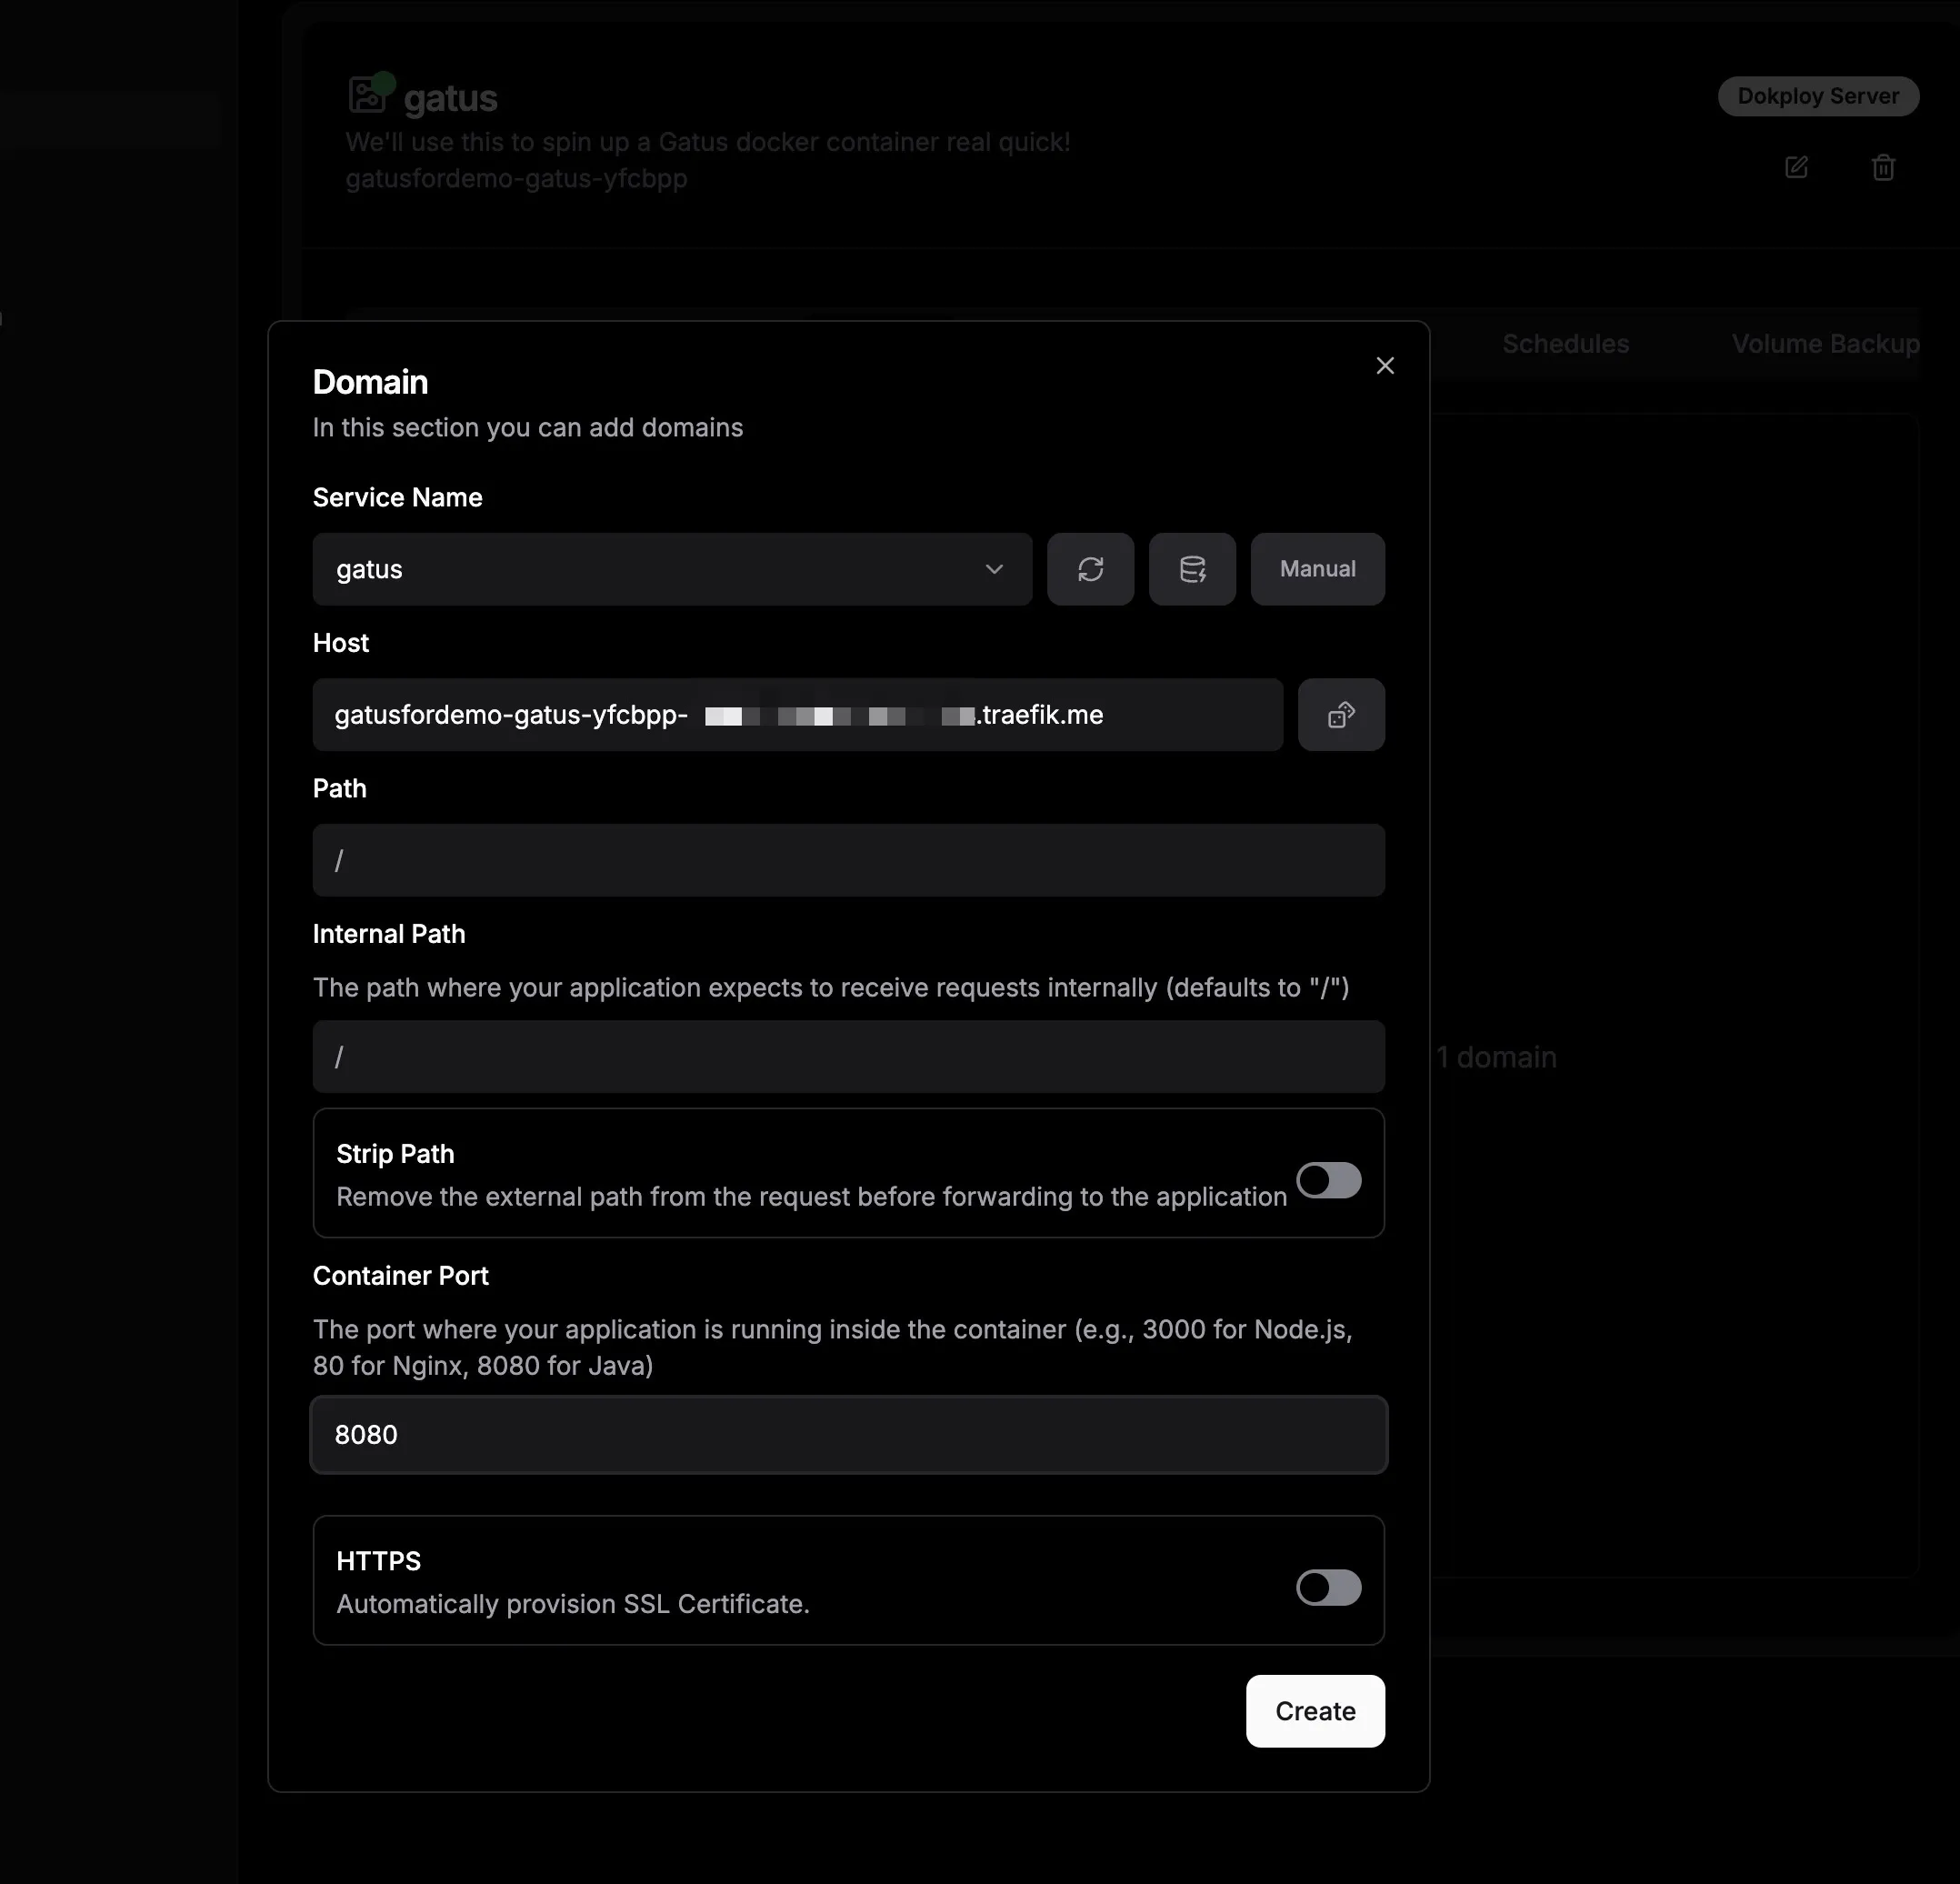
To keep things secure, we’ll need you to access your app using HTTP/HTTPS, not any other custom ports. To do this, we’ll set up a domain in your Dokploy reverse proxy. We’ll use traefik.me for this. Go to the Domains tab and click Add Domain. In the dialog that pops up, choose “gatus" in the Service Name section. Then, click the dice symbol next to the Host input field and enter the port number from your Docker Compose file in the Container Port section. Keep everything else as it is. Once you’re done, click Create.
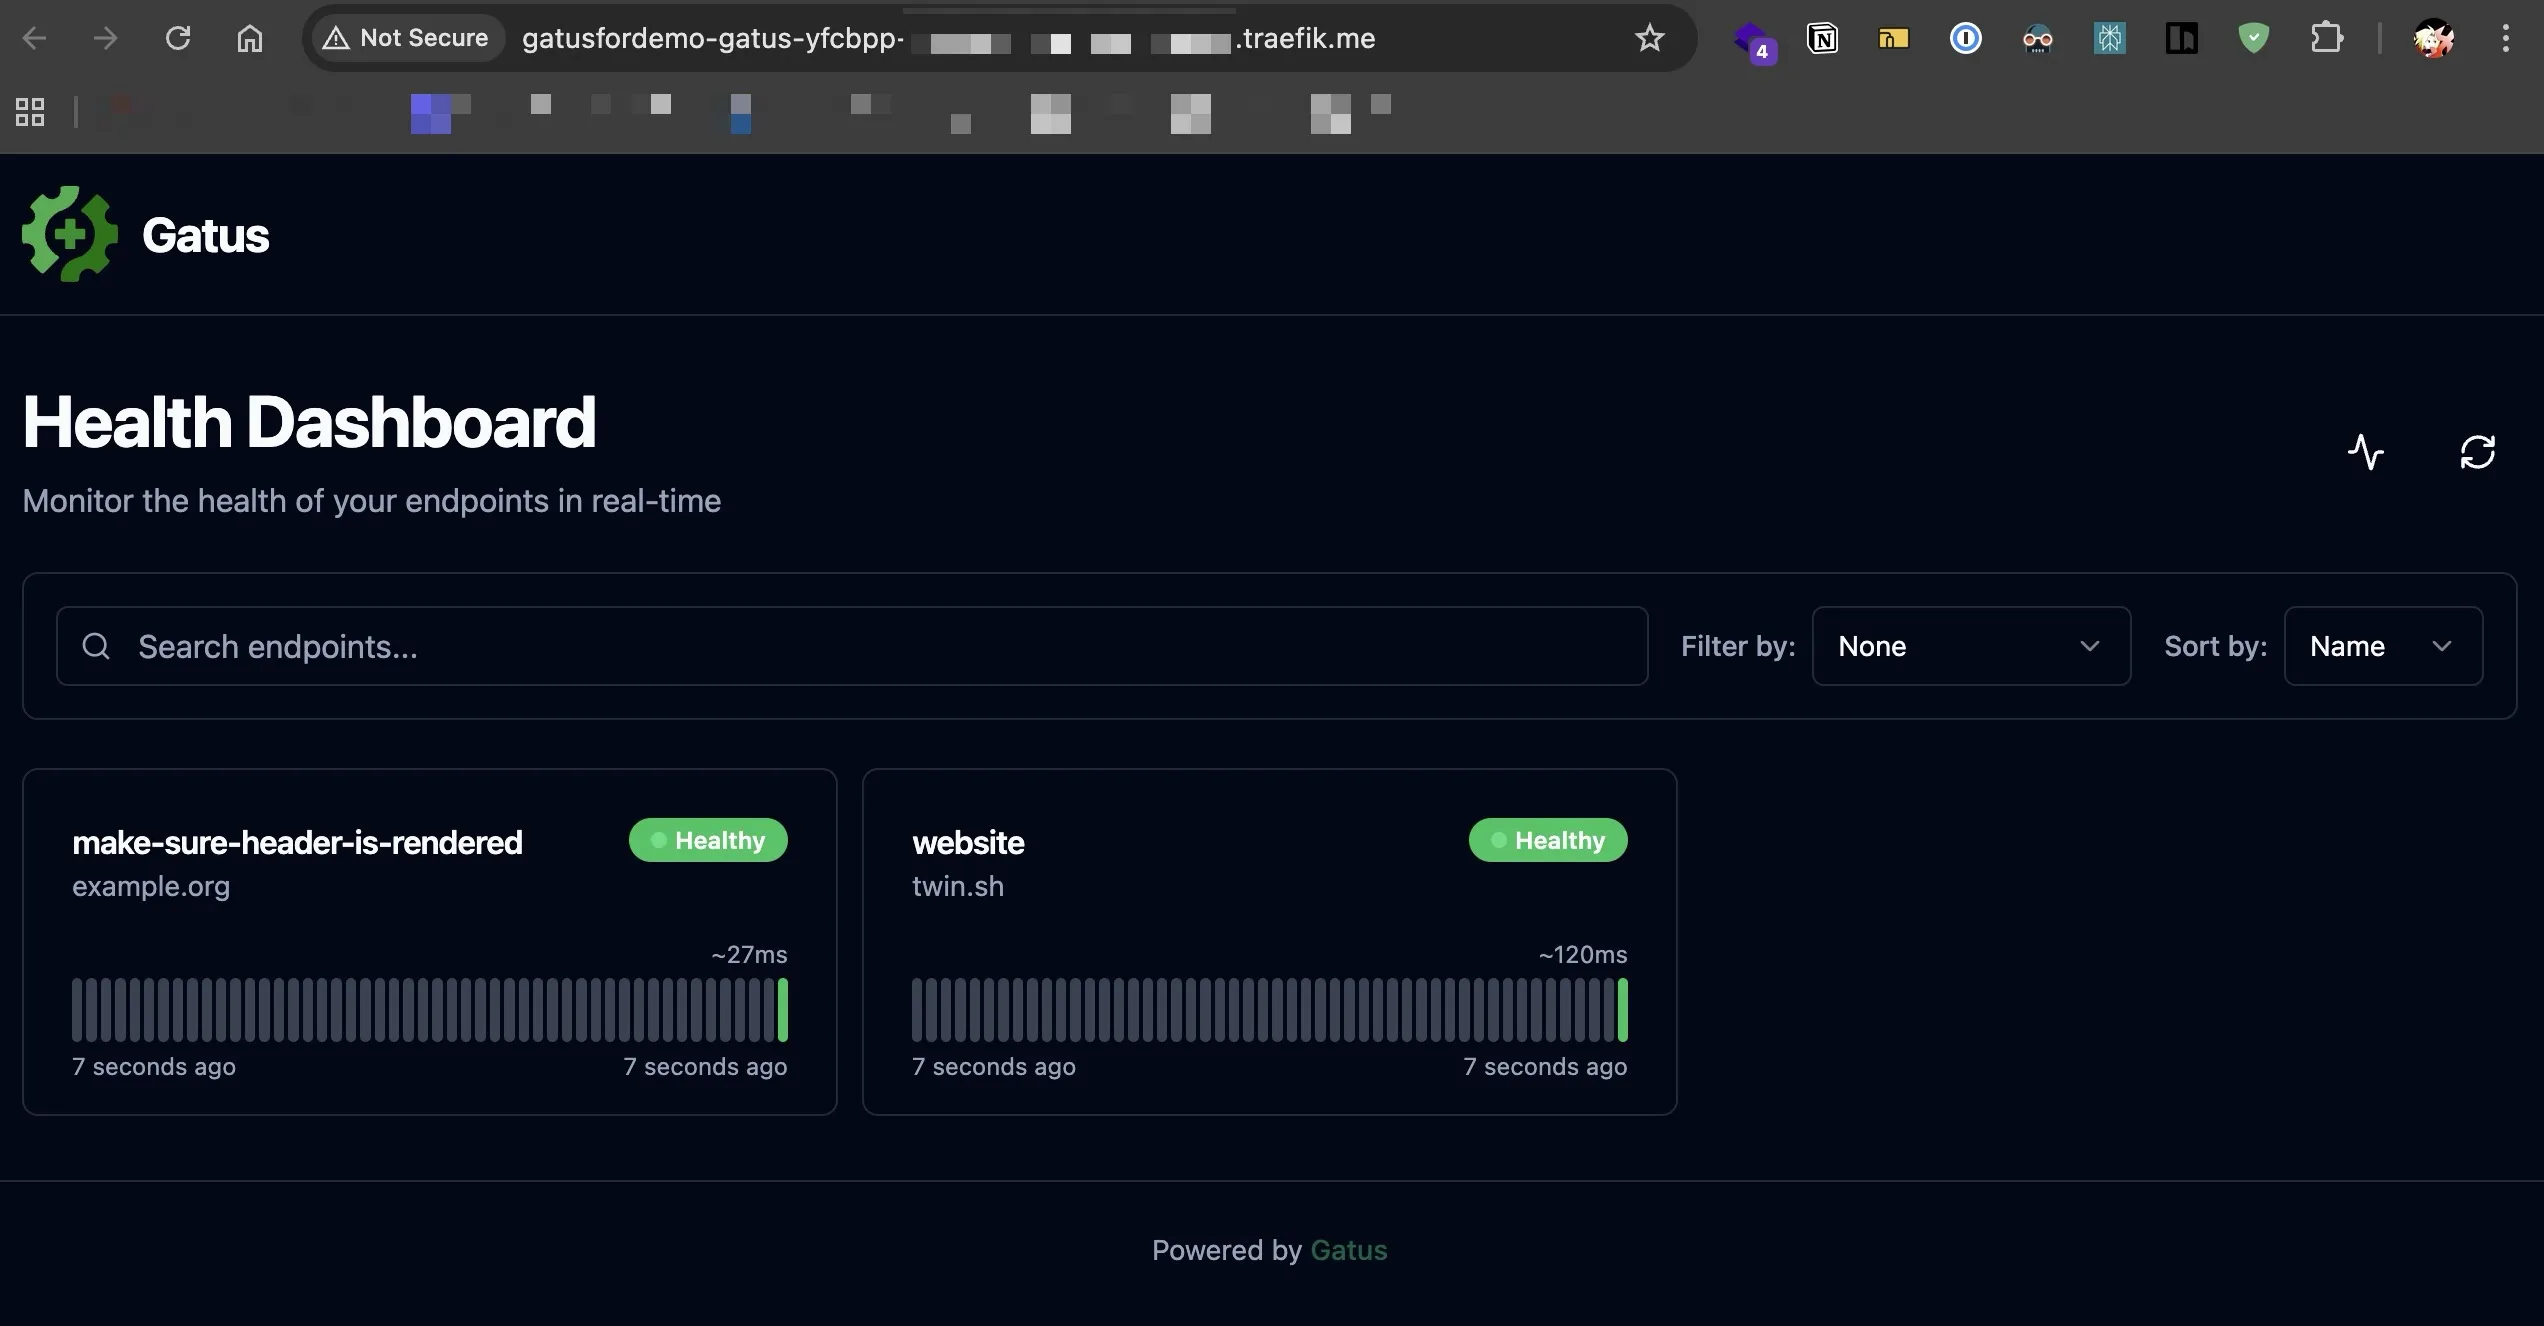
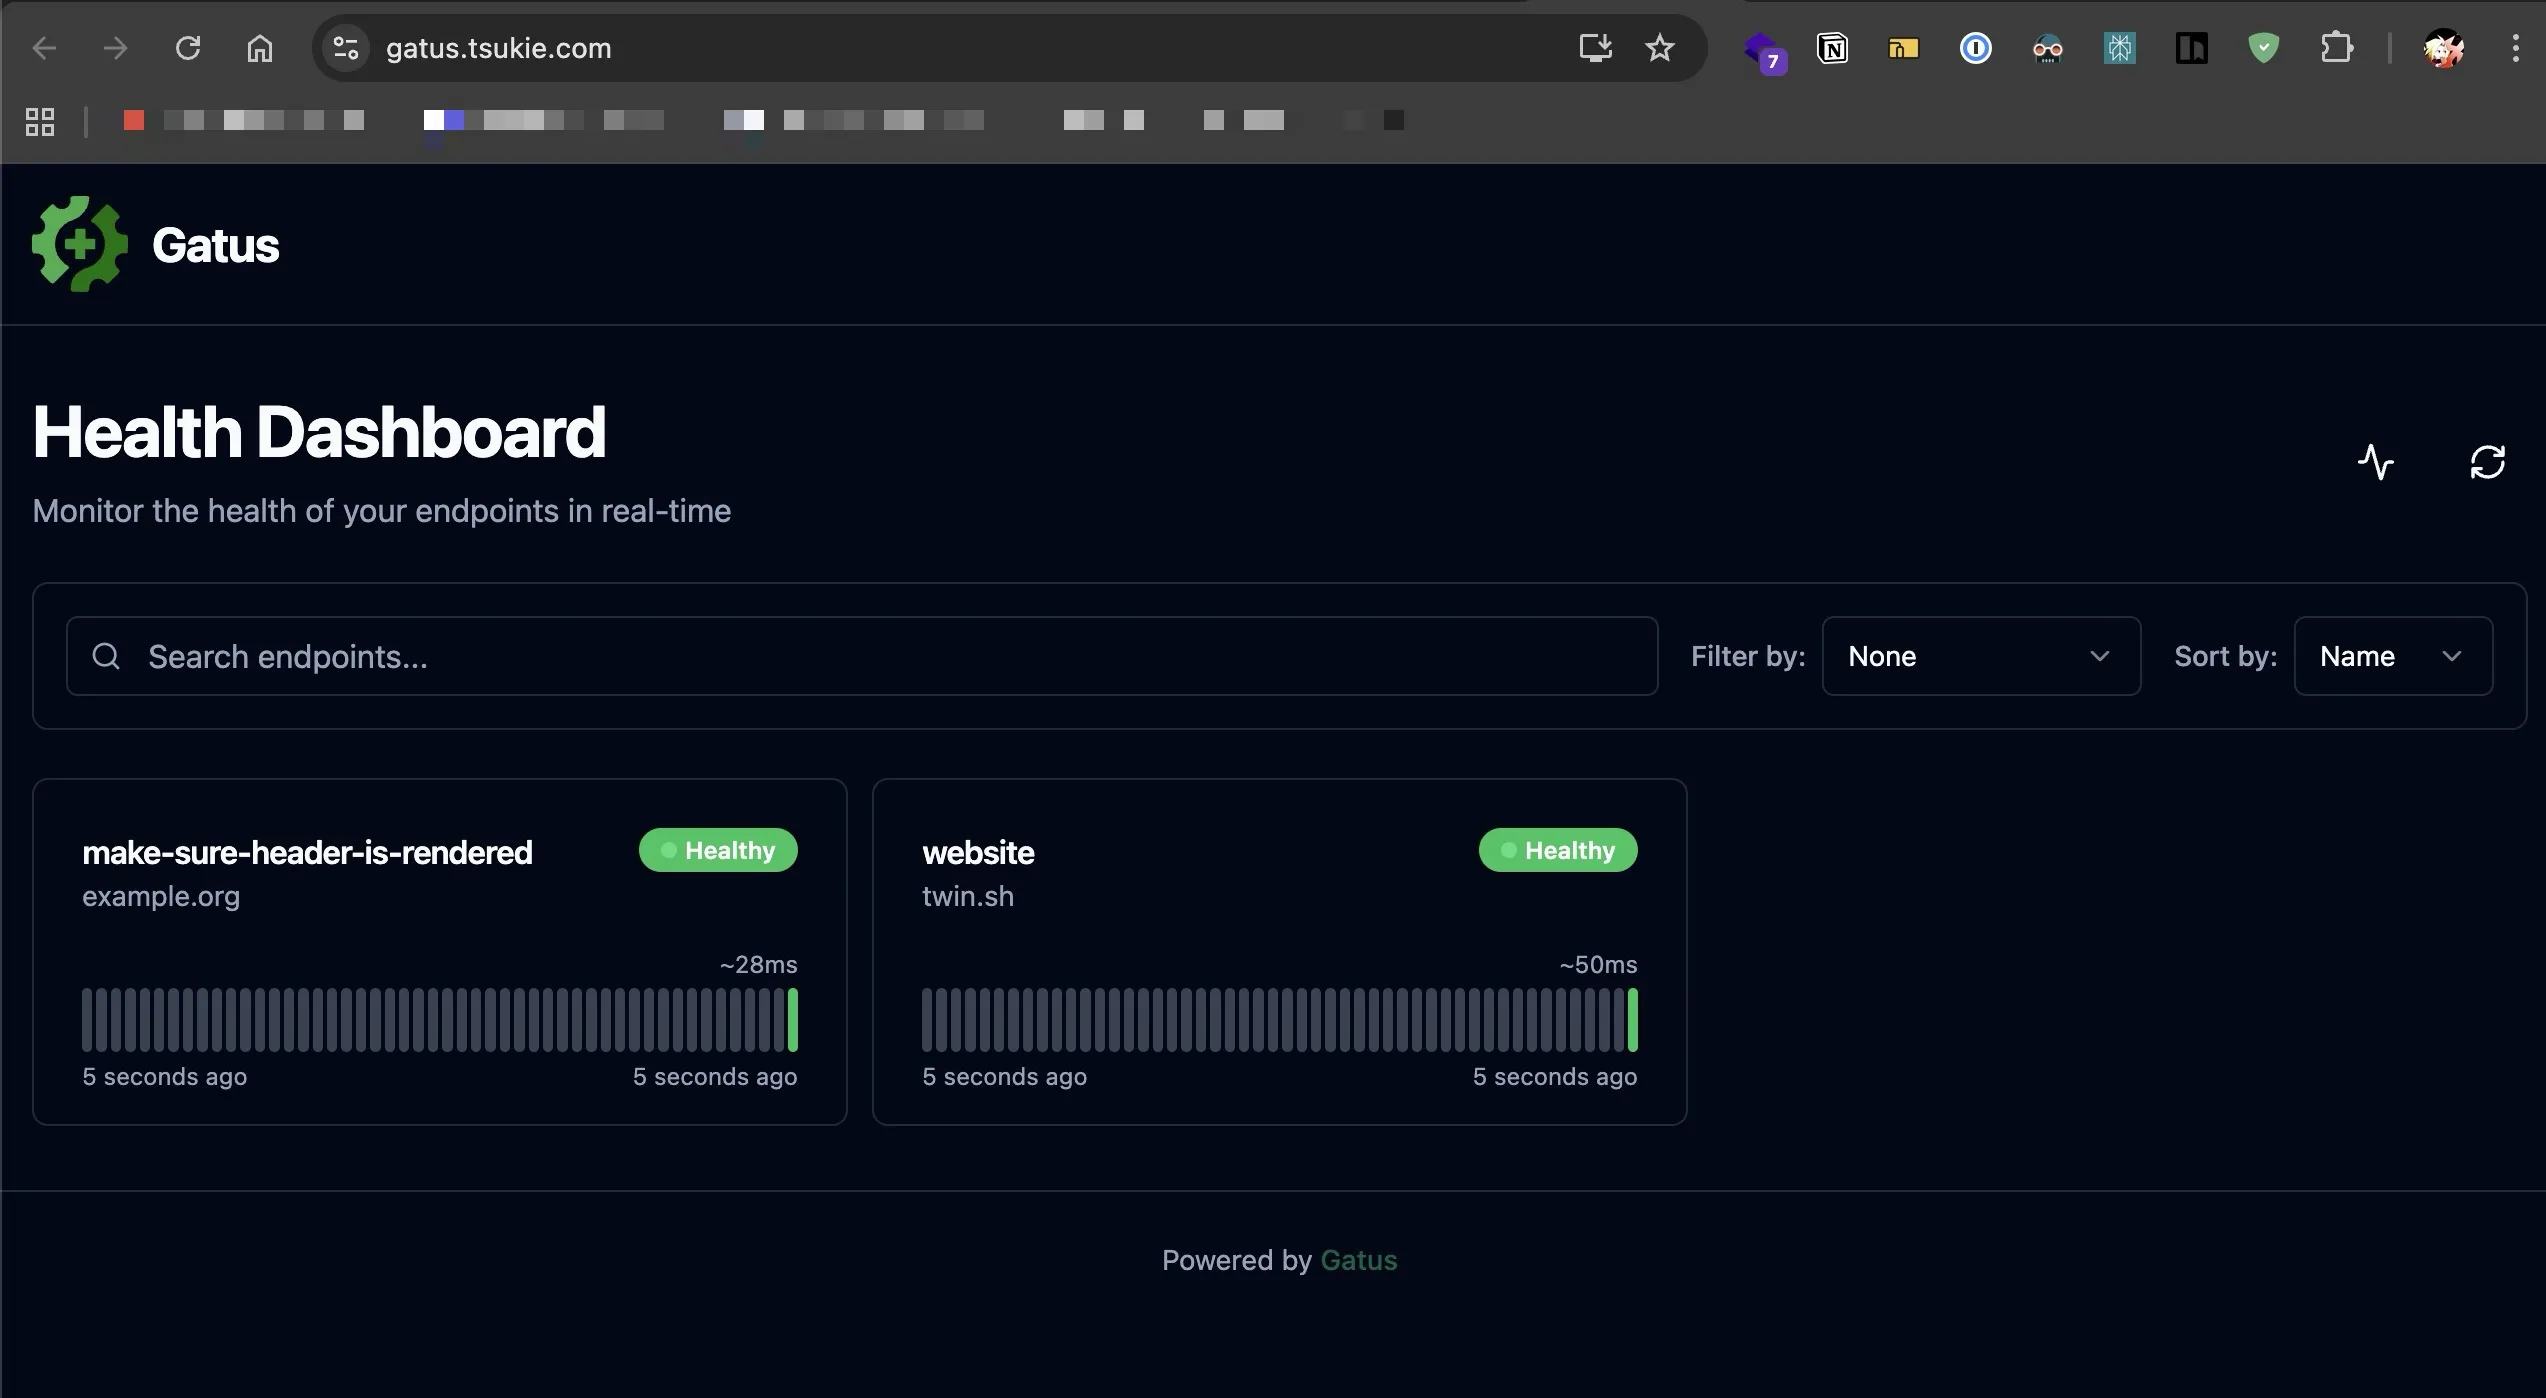
Finally, return to the General tab, click Deploy, and wait for it to finish. Then, switch to the Domains tab and access the URL defined there and you should be able to see the Gatus uptime status page. If you own a domain, I’ll guide you on how to set up your custom domain later.
Custom domain for your app
If you have a custom domain and want to use it, here’s how you can access your app through it. Basically, you’ll need to set up DNS records to direct your domain to the IP address of your OCI VPS. Then, you can use that domain in the Domains section we discussed earlier, enable HTTPS, and you’re all set! Let’s get started.
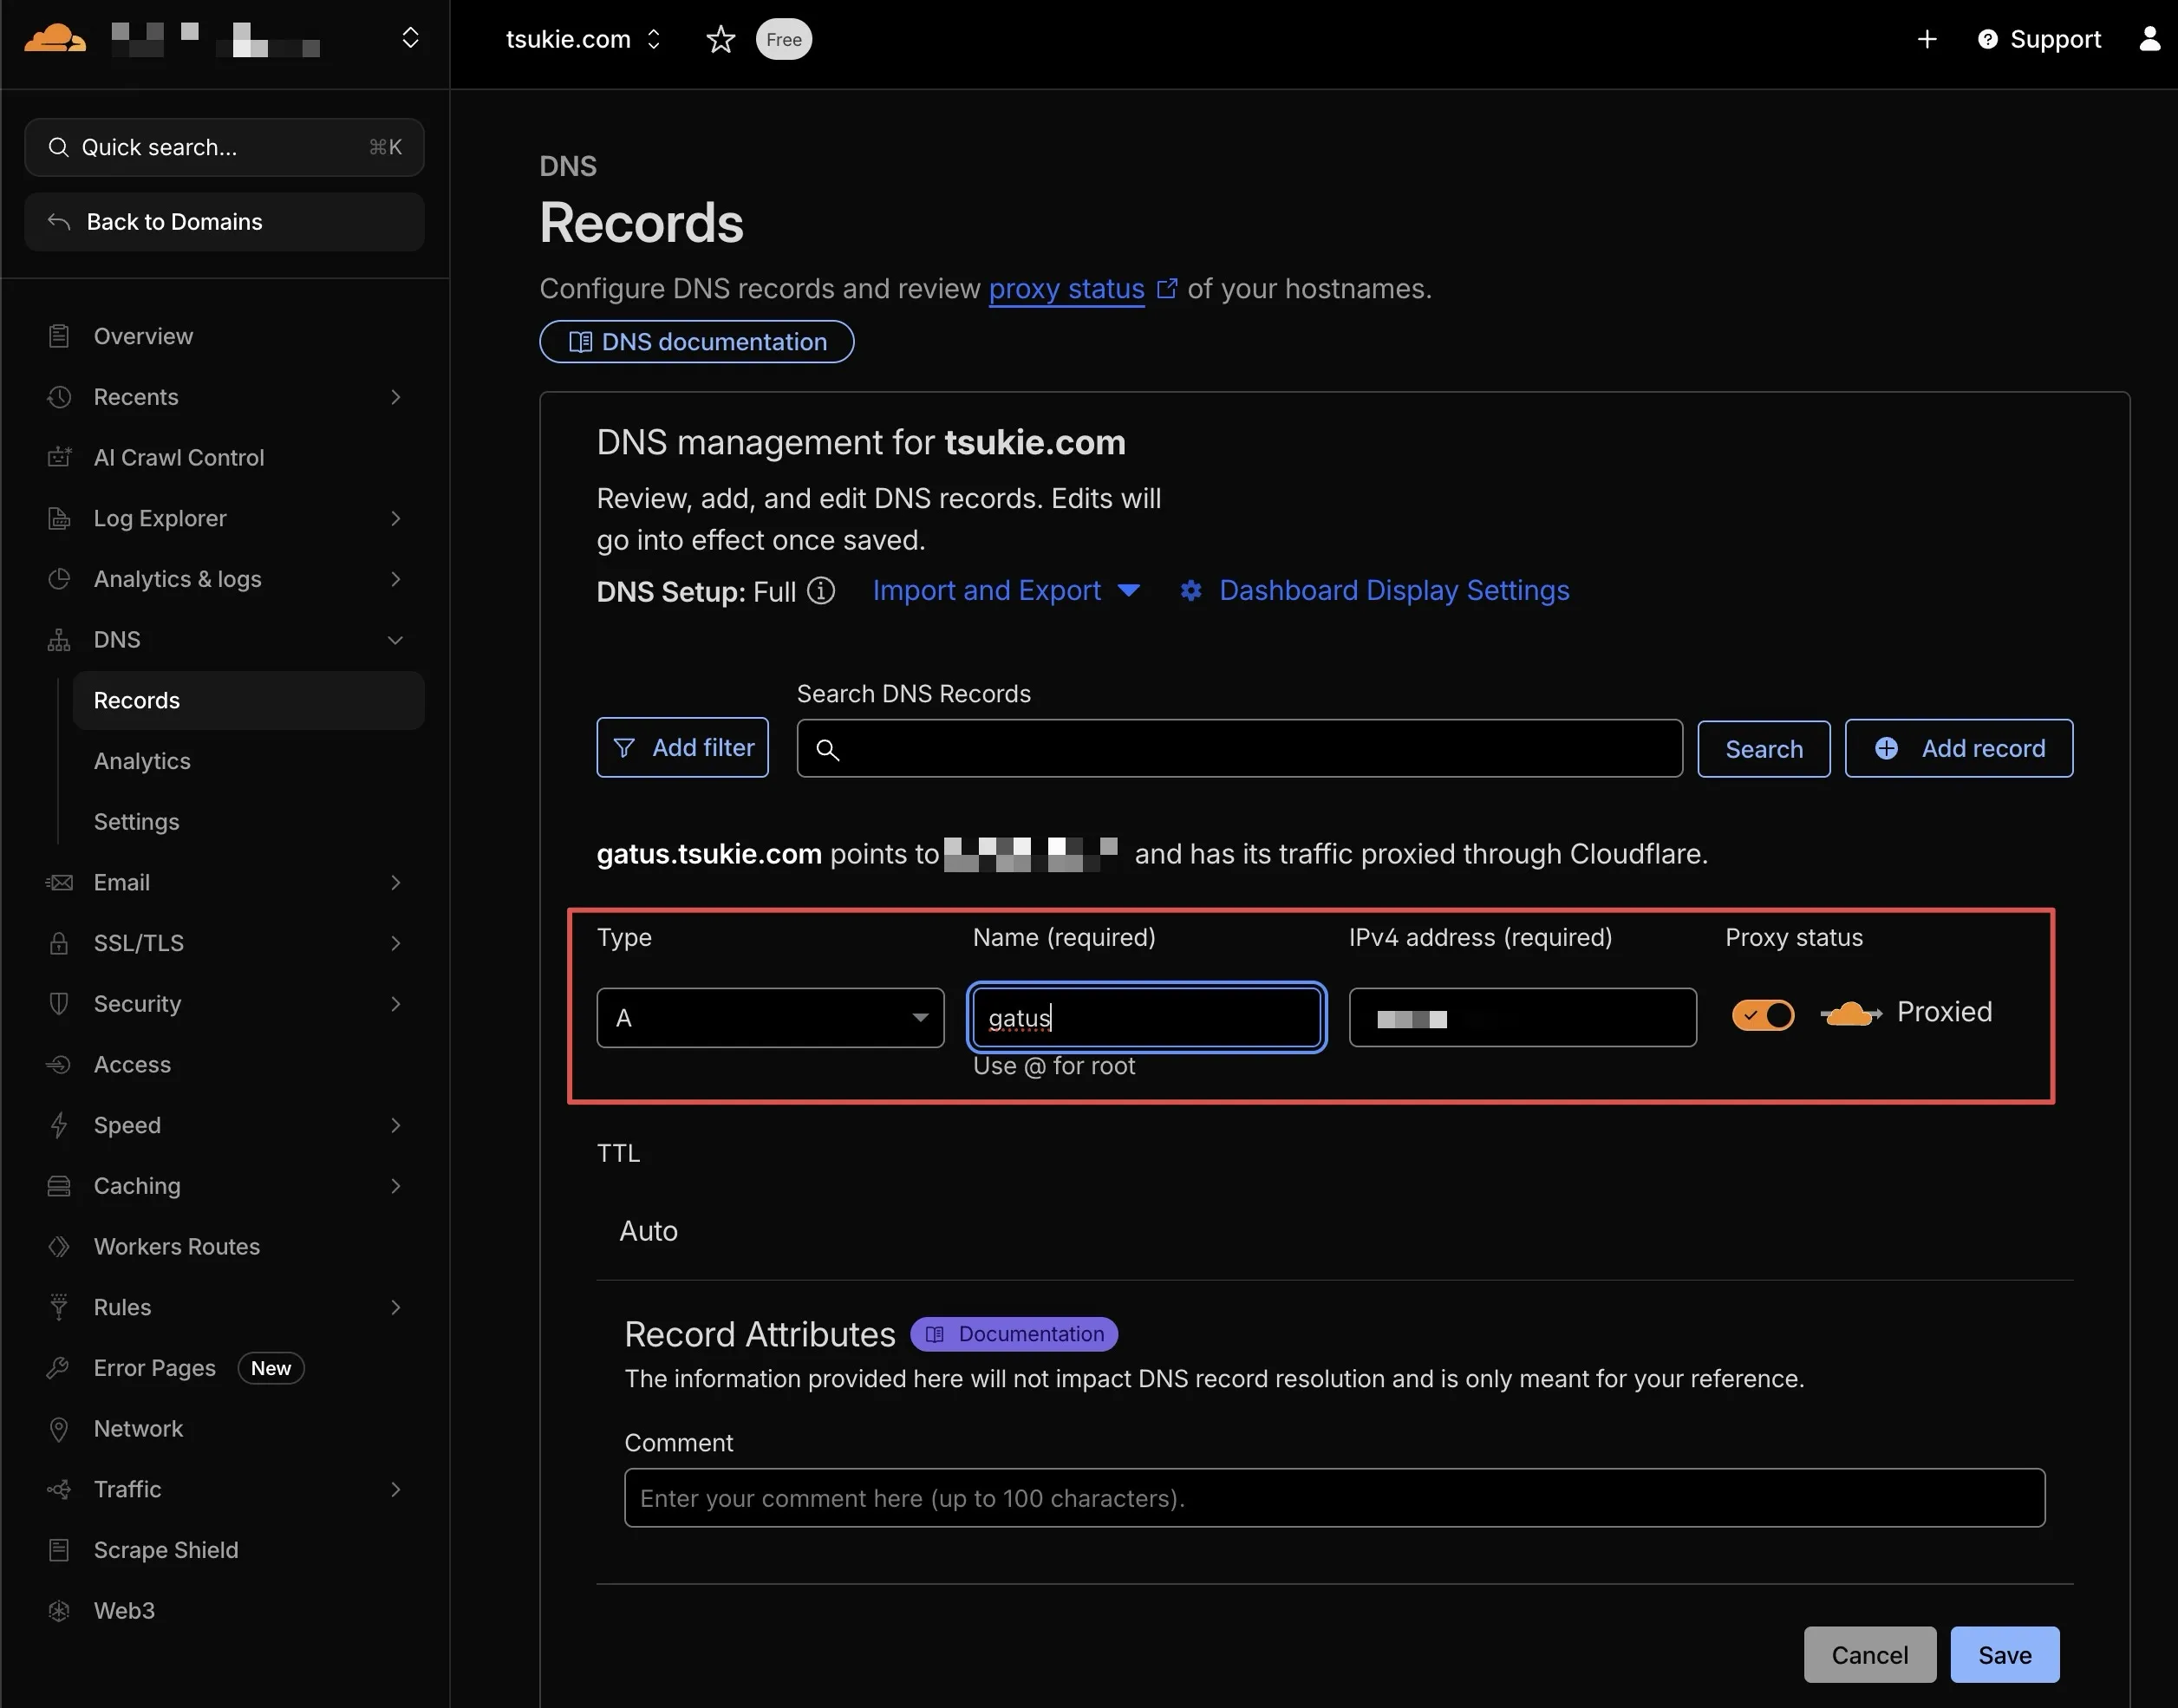
Just so you know, I’m using Cloudflare as my domain registrar, but you should be able to follow along easily even if you’re using something else like GoDaddy or Namecheap. In the Cloudflare dashboard sidebar, click on DNS > Records. Then, click on Add record, enter your domain name (or subdomain name if you want to access your app through a subdomain) in the Name field, enter your VPS IP in the IPv4 address field, and click Save.
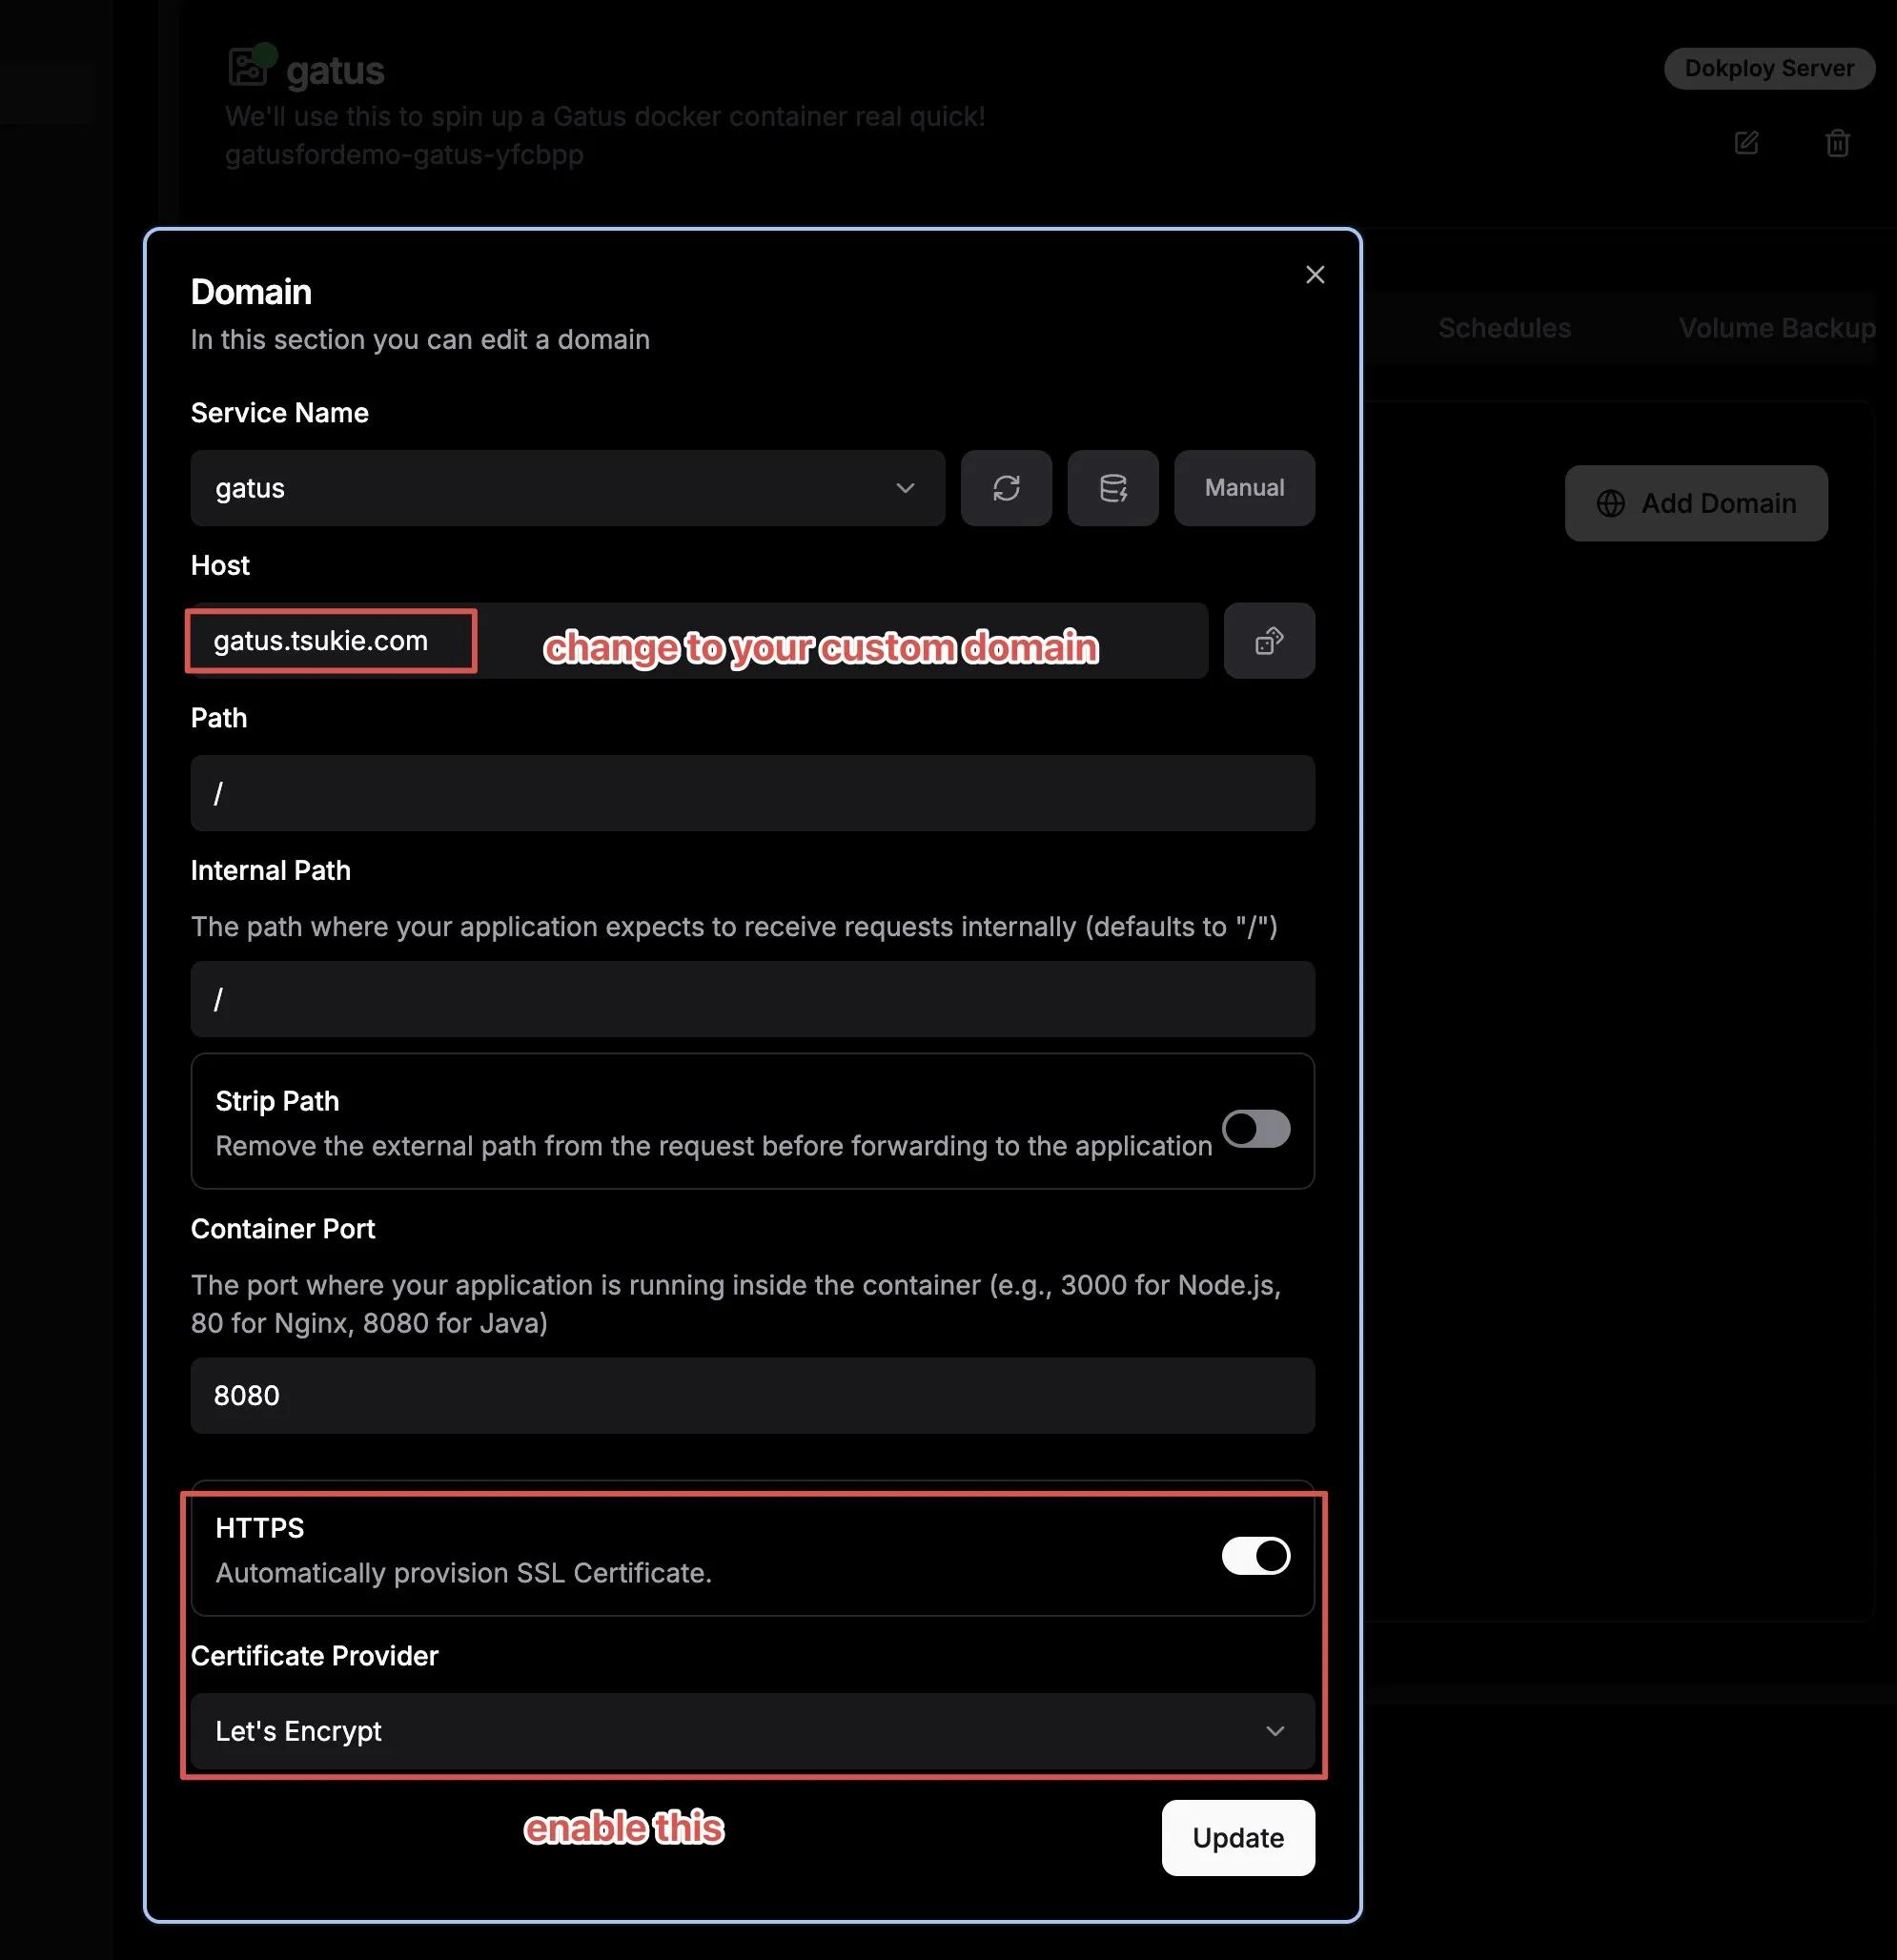
Go back to Deploy Domains tab, replace the value in Host field with the domain/subdomain you just set earlier, enable HTTPS option (just pick Let’s Encrypt in the dropdown), and redeploy once again using the Deploy button in General tab.
You should now be able to access your app via your domain/subdomain through the https protocol.
Dockerize your app for self-hosting.
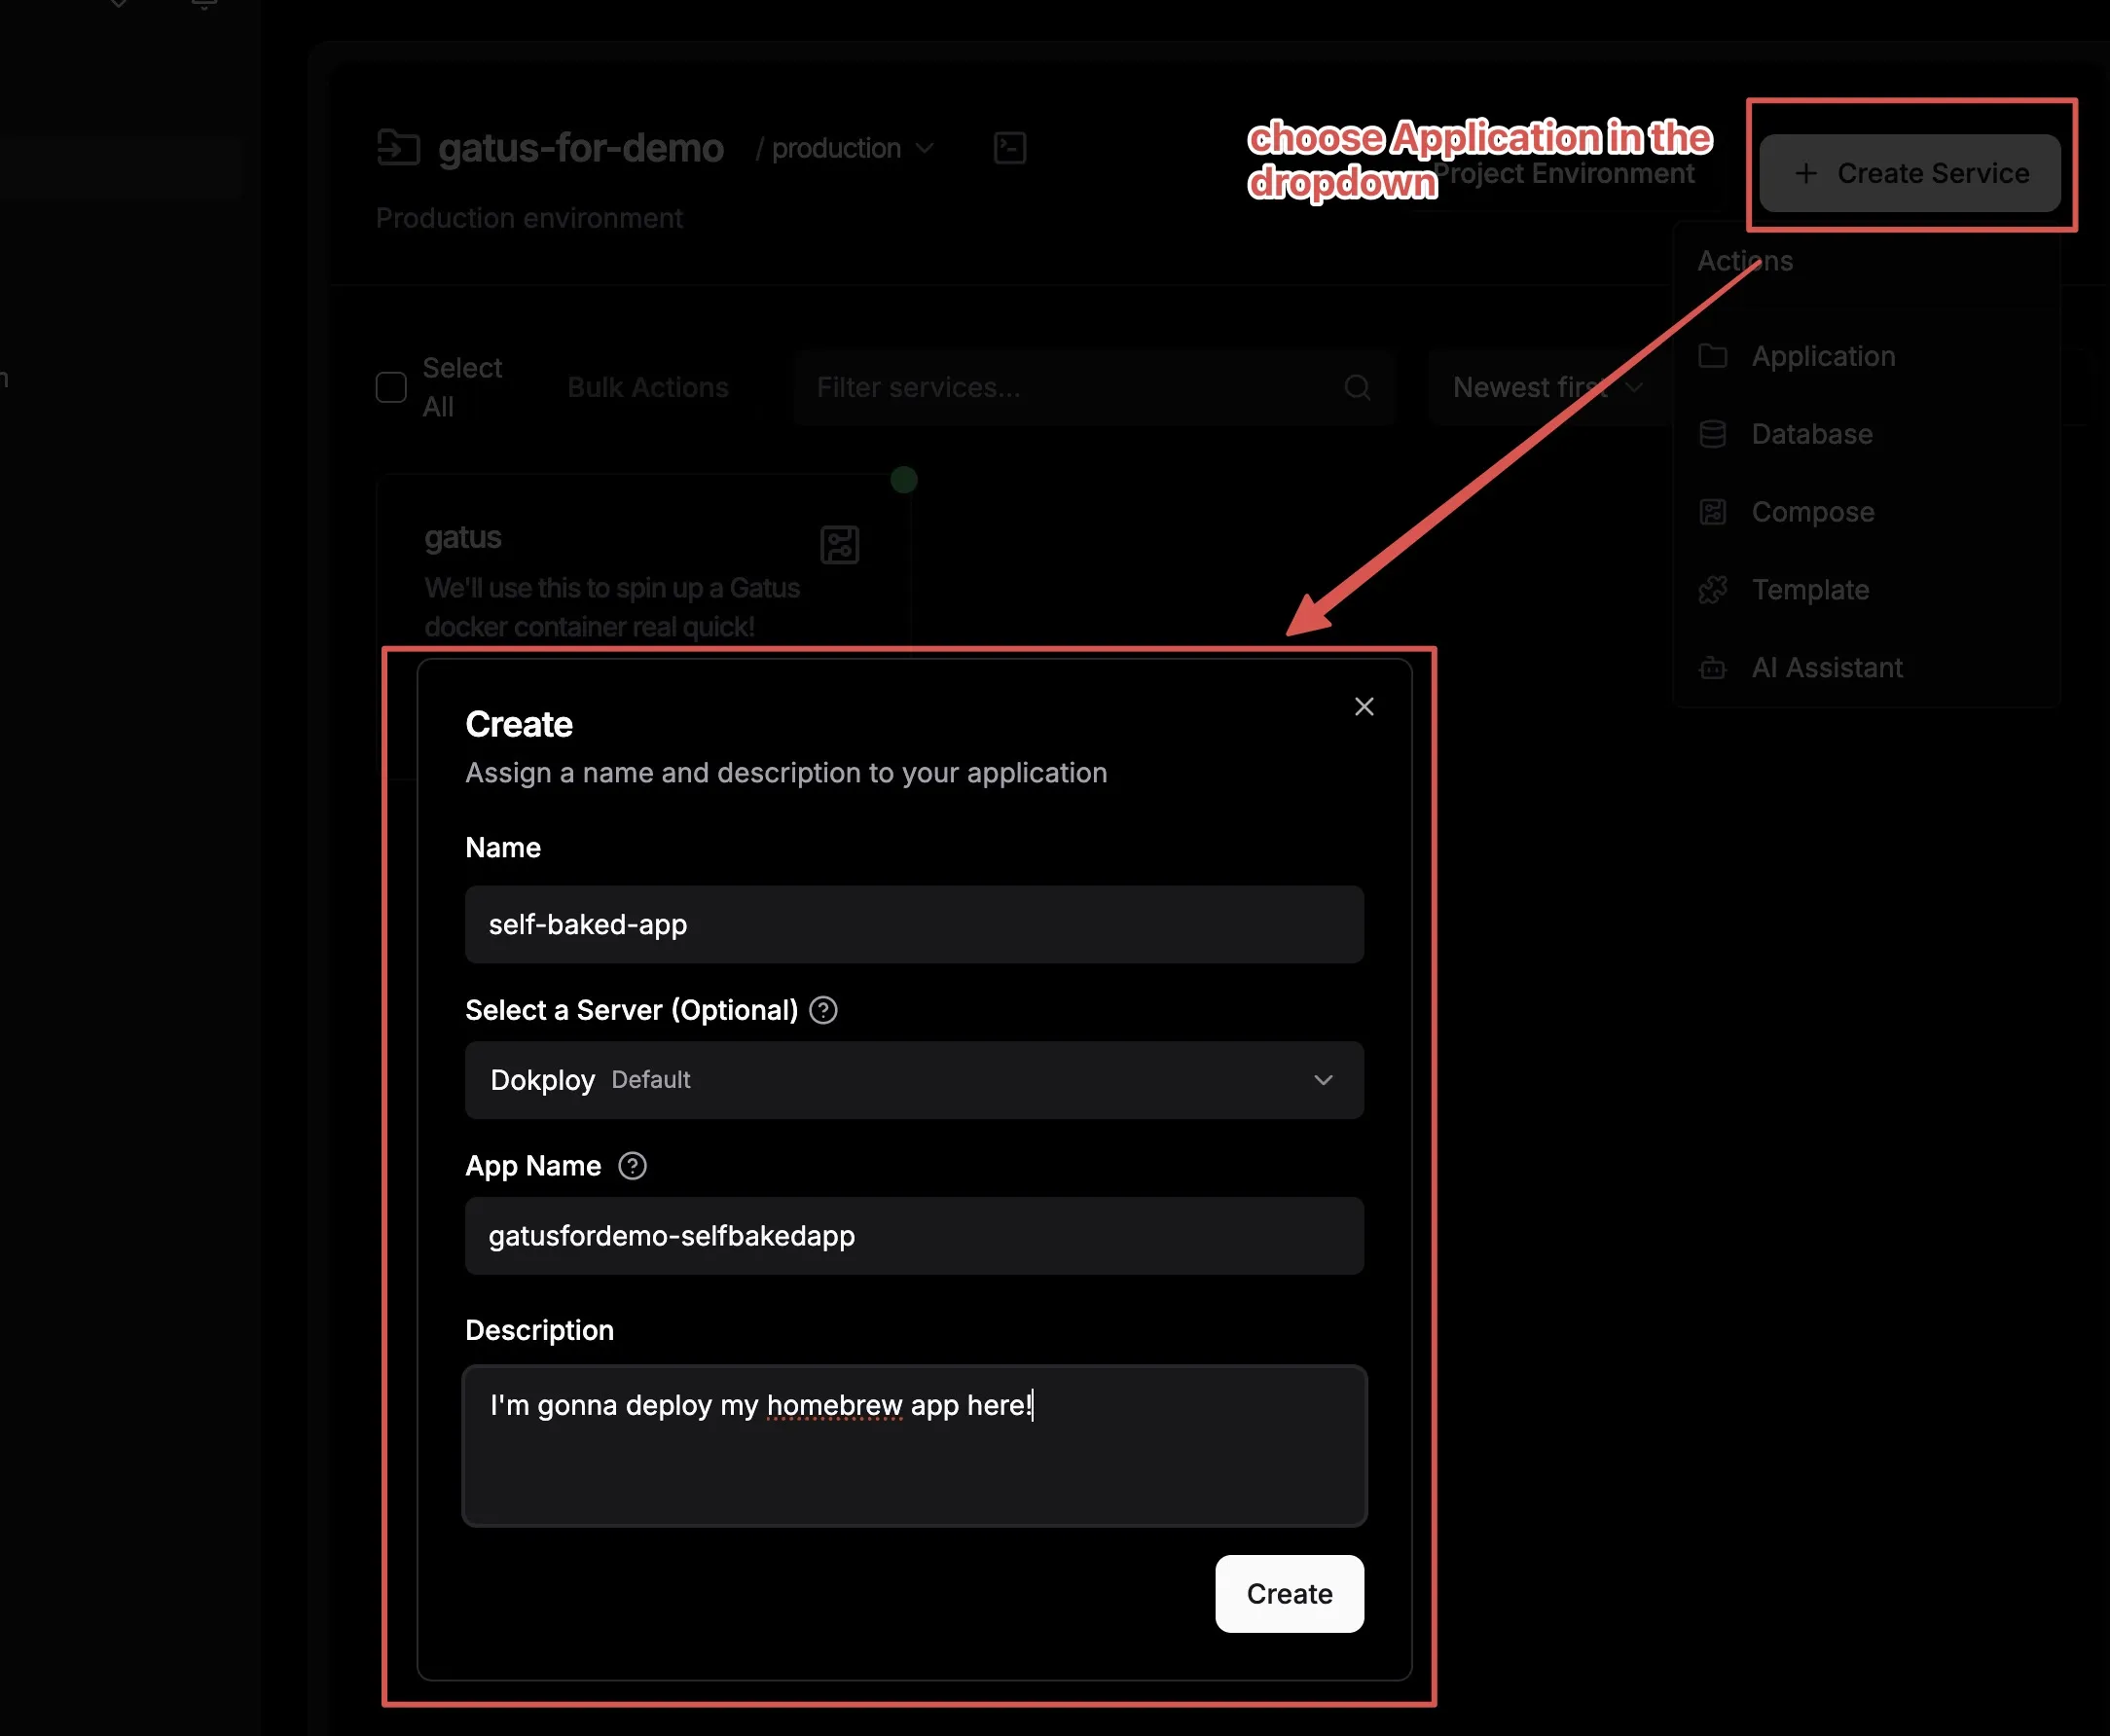
You can either create an Application by clicking Create Service > Application and hook your source code to the Dokploy Application as instructed in the Provider section. However, this isn’t recommended for production deployment as it consumes significant resources in your VPS and can potentially bring down your VPS and its contents. (Note: This is less likely with a 24GB RAM OCI VPS, but it’s worth considering, especially if you have multiple projects deployed in parallel).
Or build your Docker image, push it to a Docker registry, and have Dokploy pull it when running a Docker Compose template. This is recommended for deploying to production, especially on low-end VPS with limited resources. We’ll use GitHub Docker Registry in this tutorial.
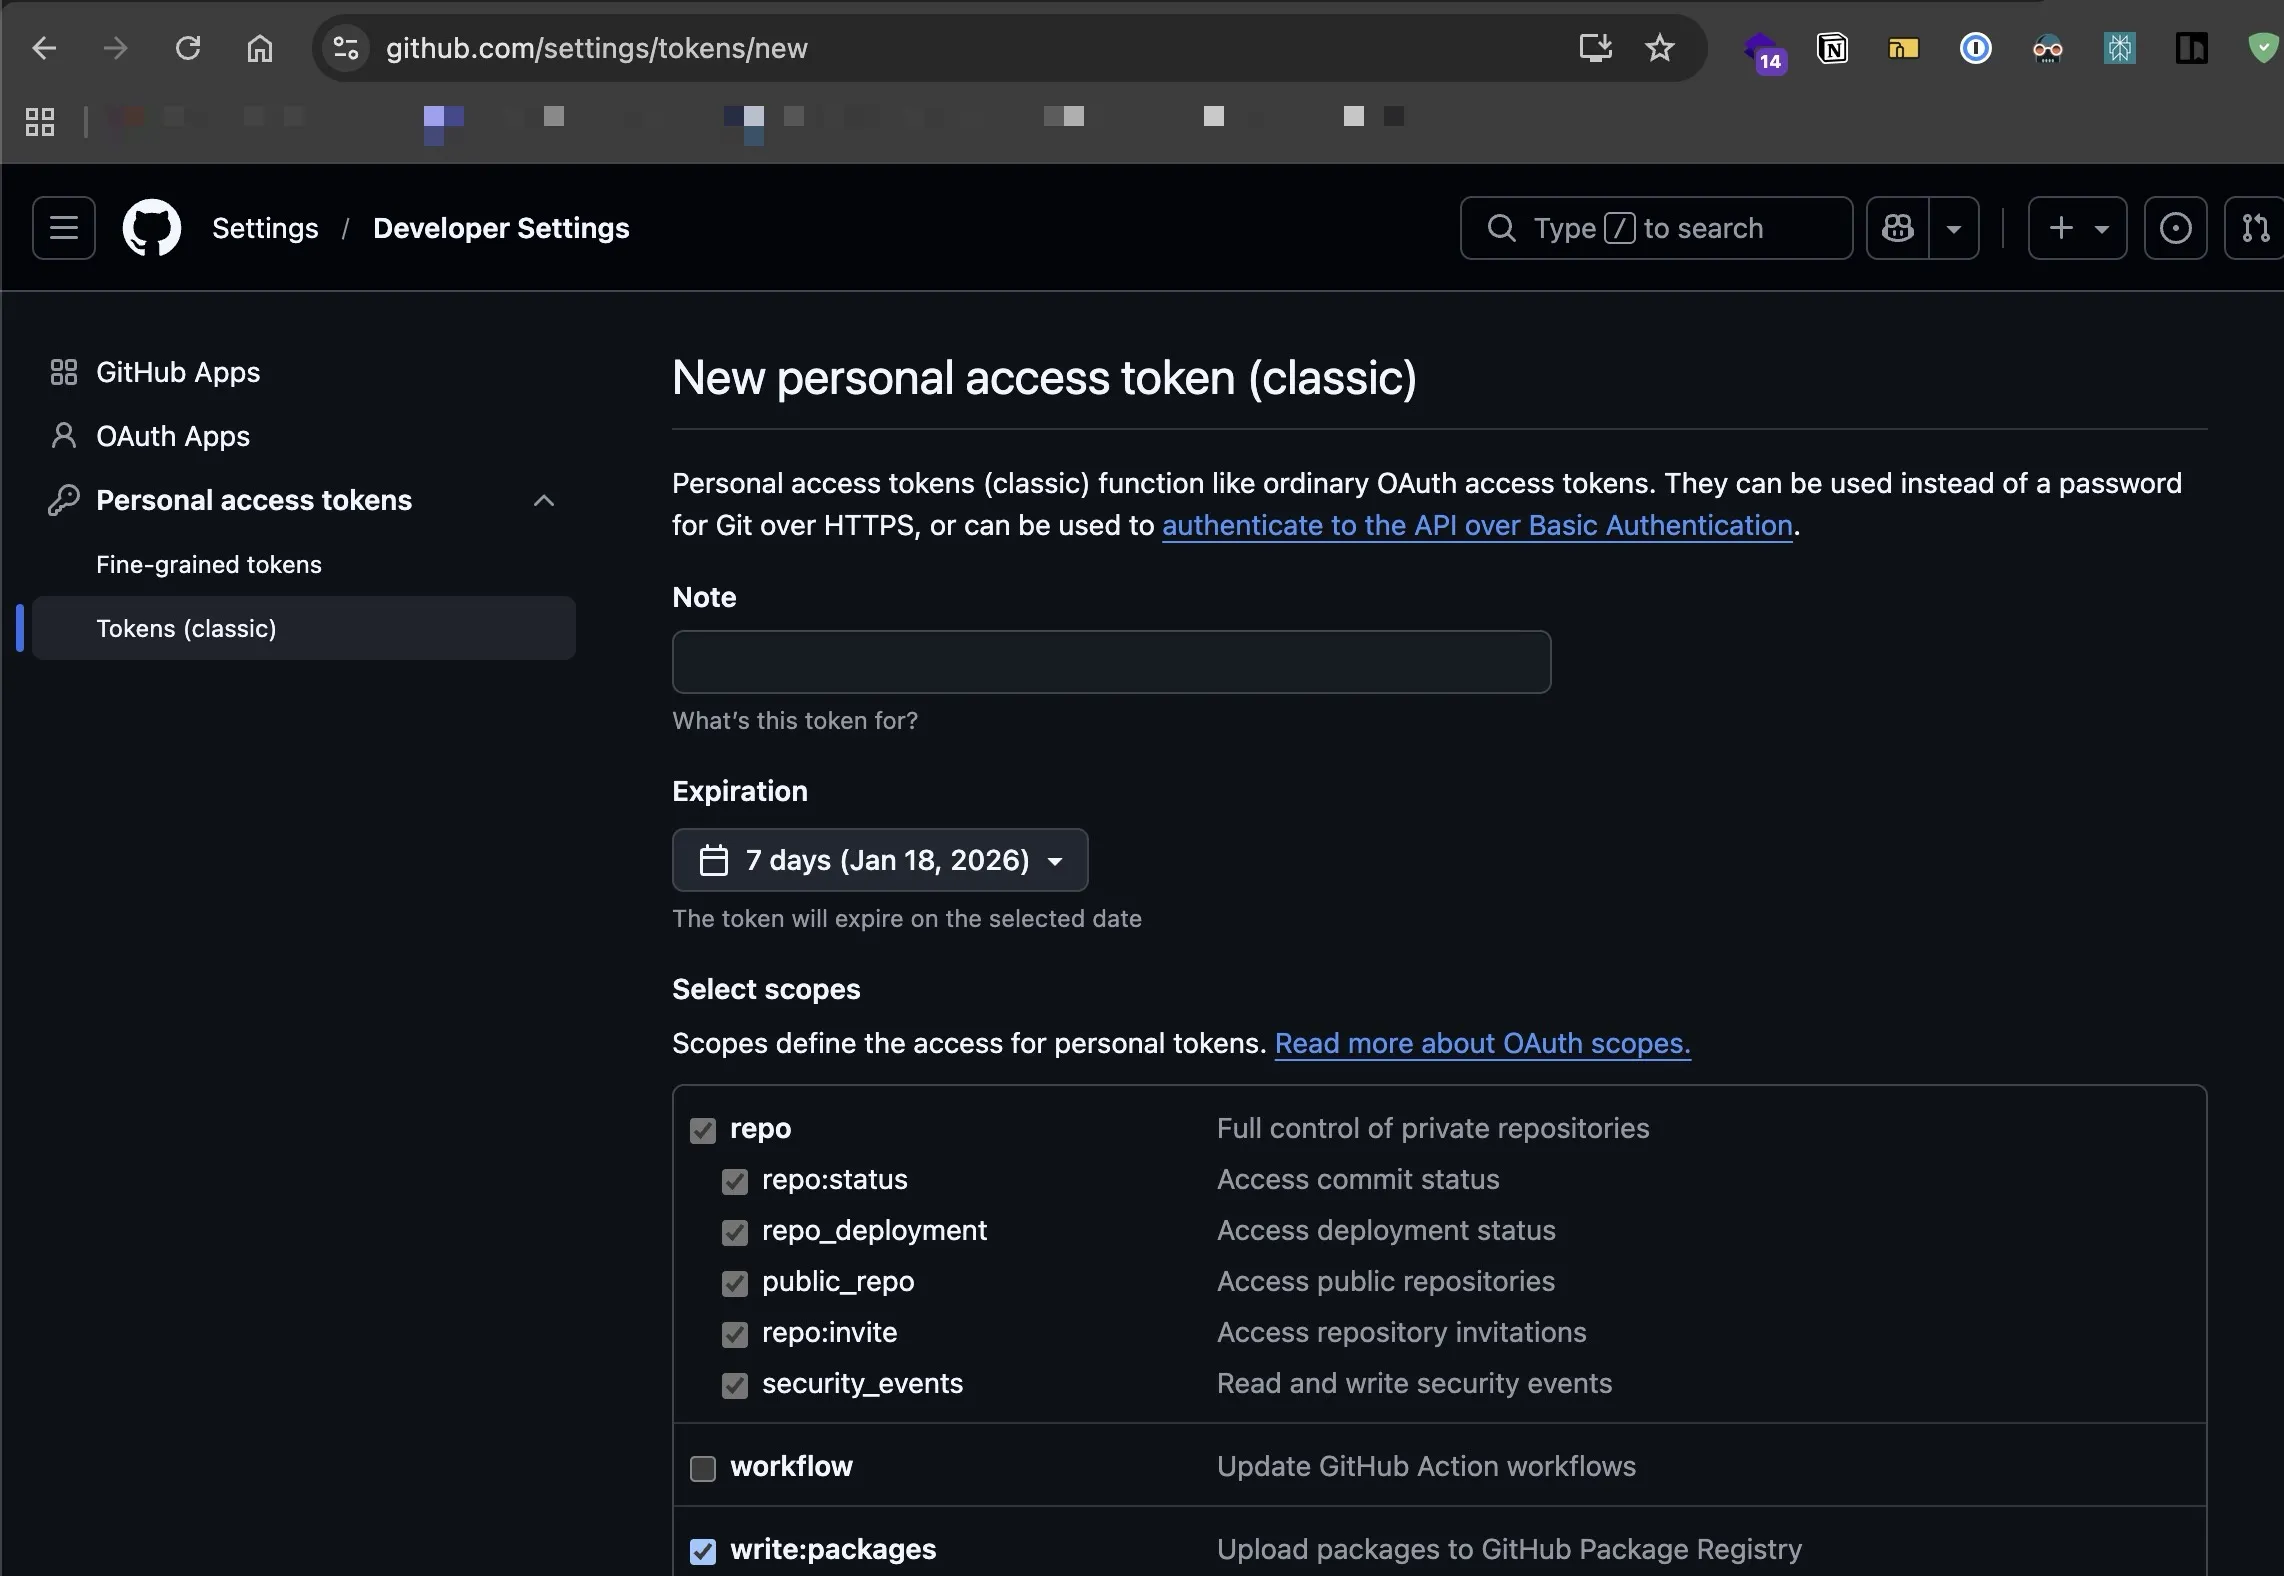
First, create an access token on GitHub to push your build.
We will dockerize a simple Hello world app by creating a Dockerfile to package our app, building it and pushing artifacts to GitHub Docker Registry, and having Dokploy pulling the artifacts from there and deploying to the internet.
First, clone this project to your local machine. It’s a simple Go script that starts a server that echoes “Hello world” when accessed via a browser. The project includes a Dockerfile that packages our application into an image, allowing us to push it to a registry and pull it from the registry to use.
After finishing cloning, go into the root folder of the project and execute these commands below to build and push your image to your Github registry. I will assume your package will be named deploy-homebrew-app-example to execute these commands:
# Authenticate
docker login ghcr.io -u YOUR_USERNAME -p YOUR_GITHUB_TOKEN
# Build
docker build -t ghcr.io/<YOUR_GITHUB_USERNAME>/deploy-homebrew-app-example:latest .
# Push
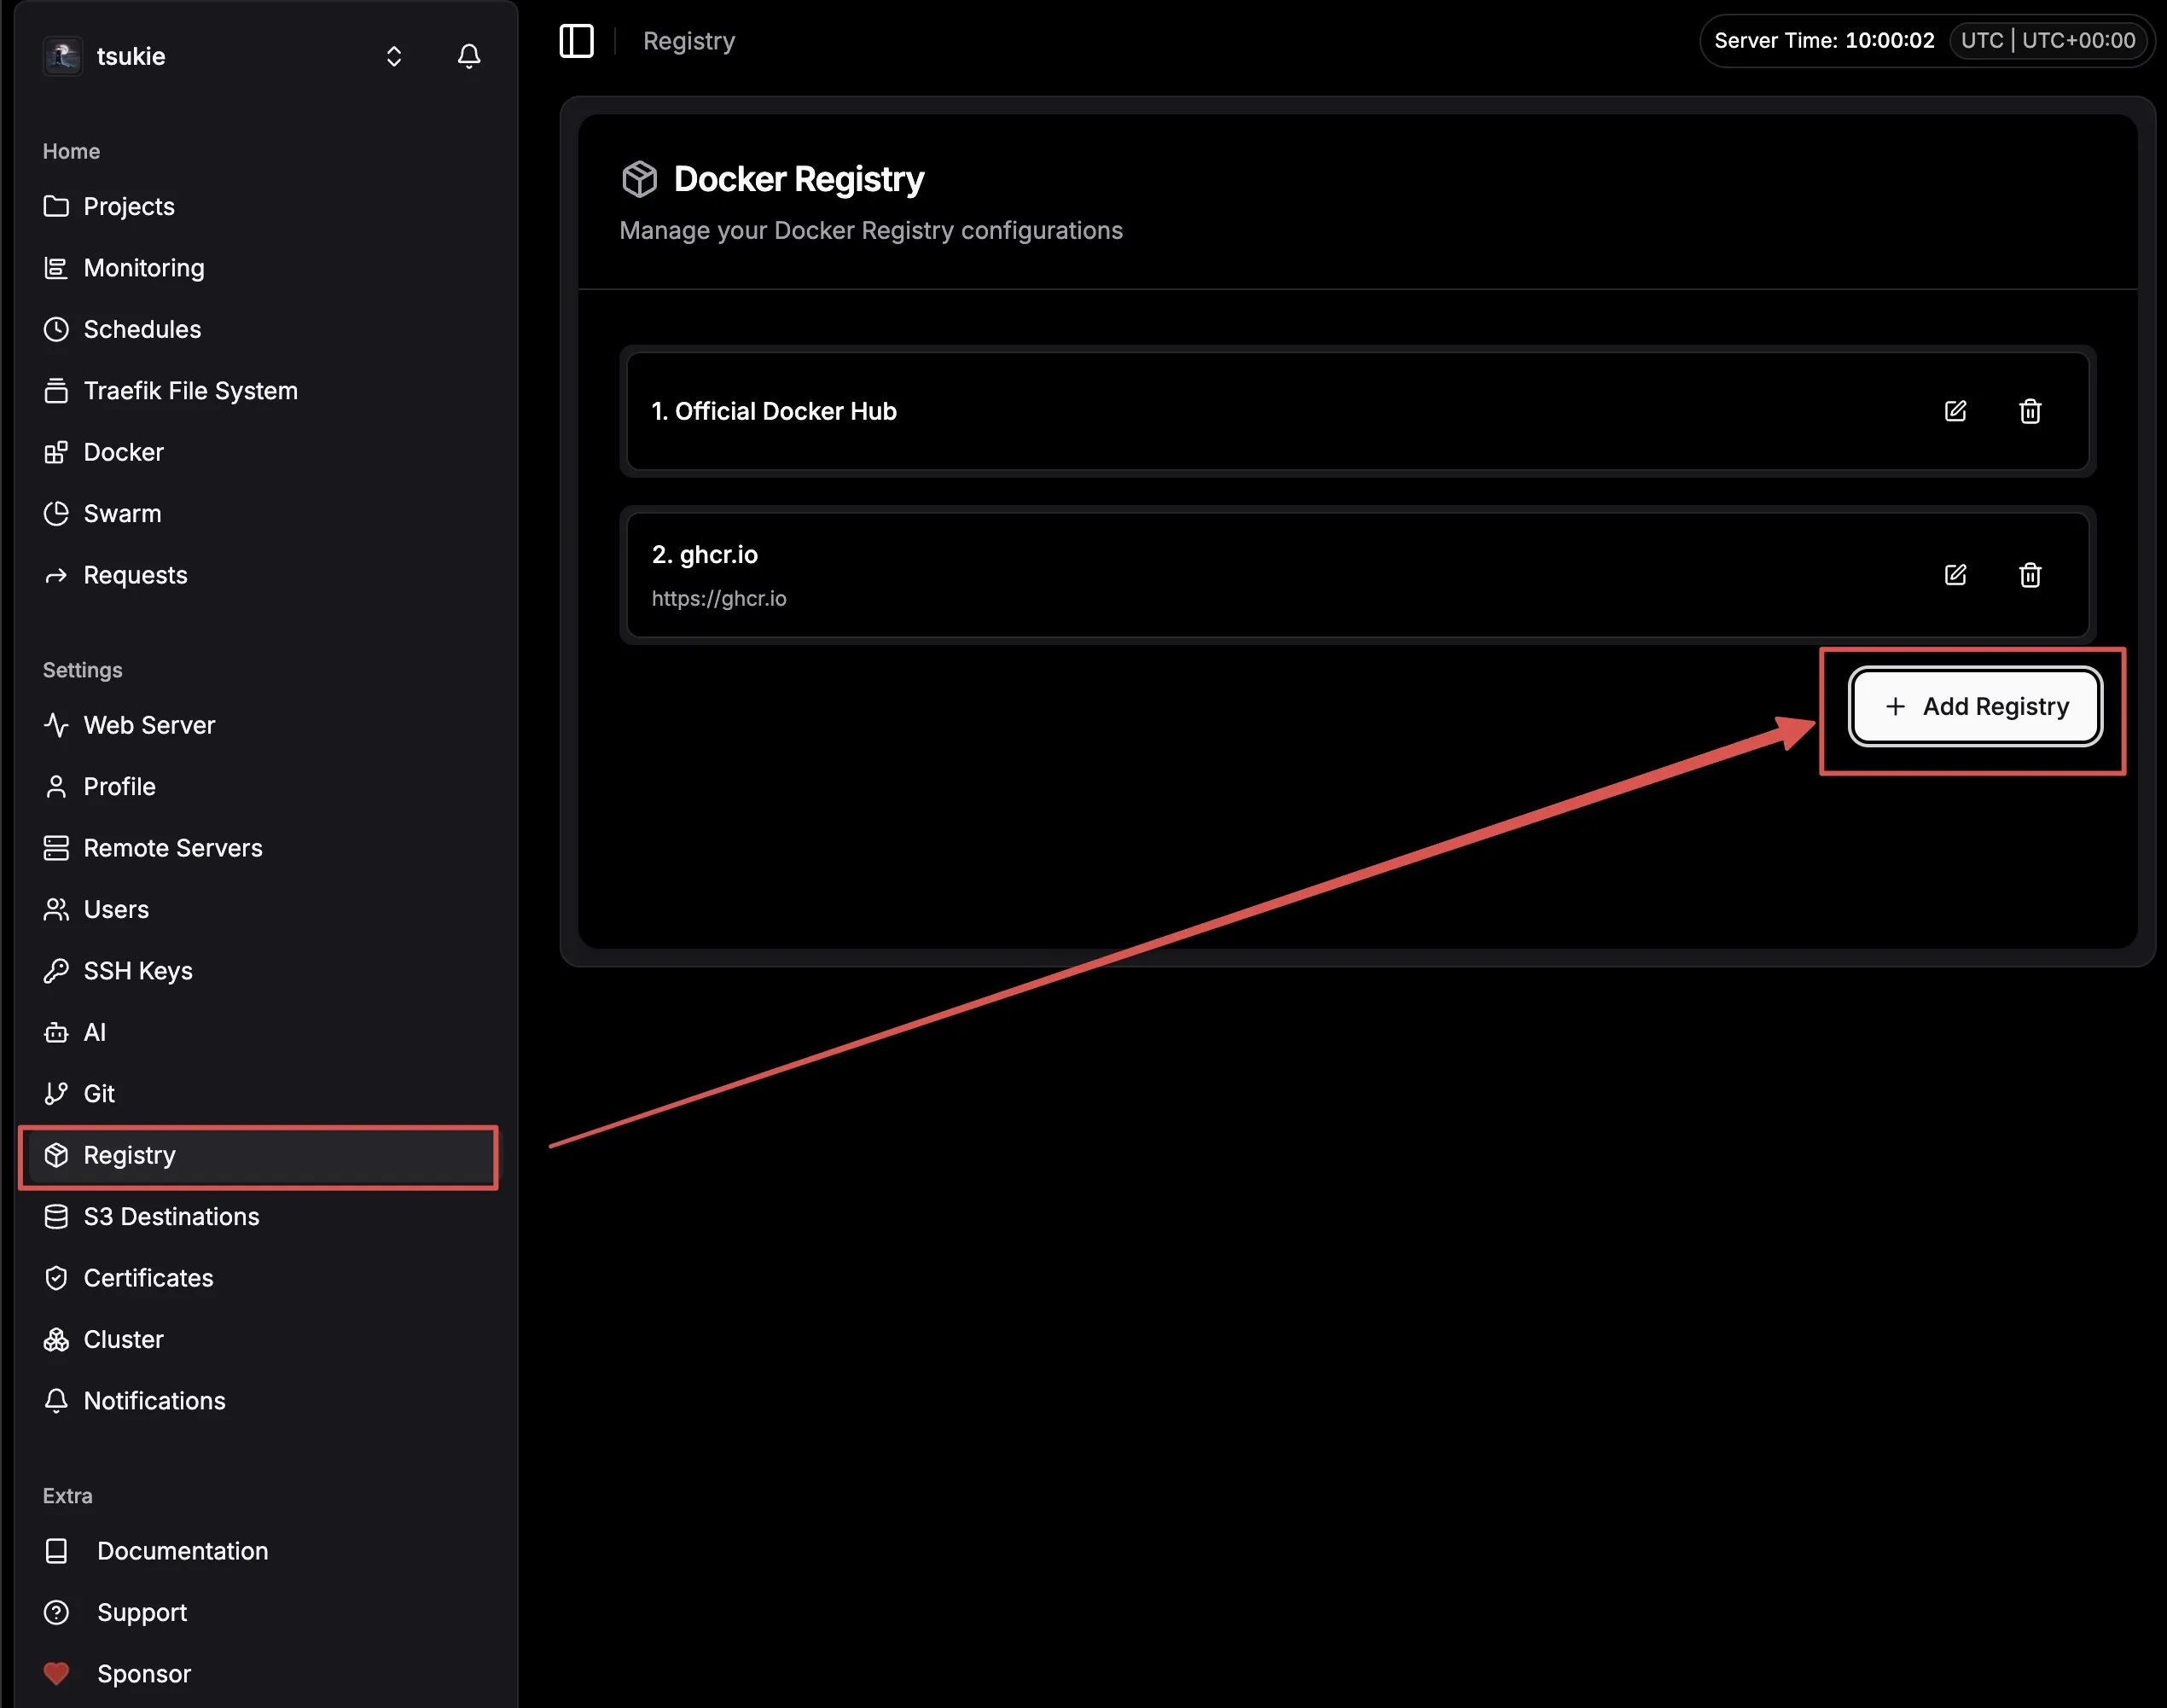
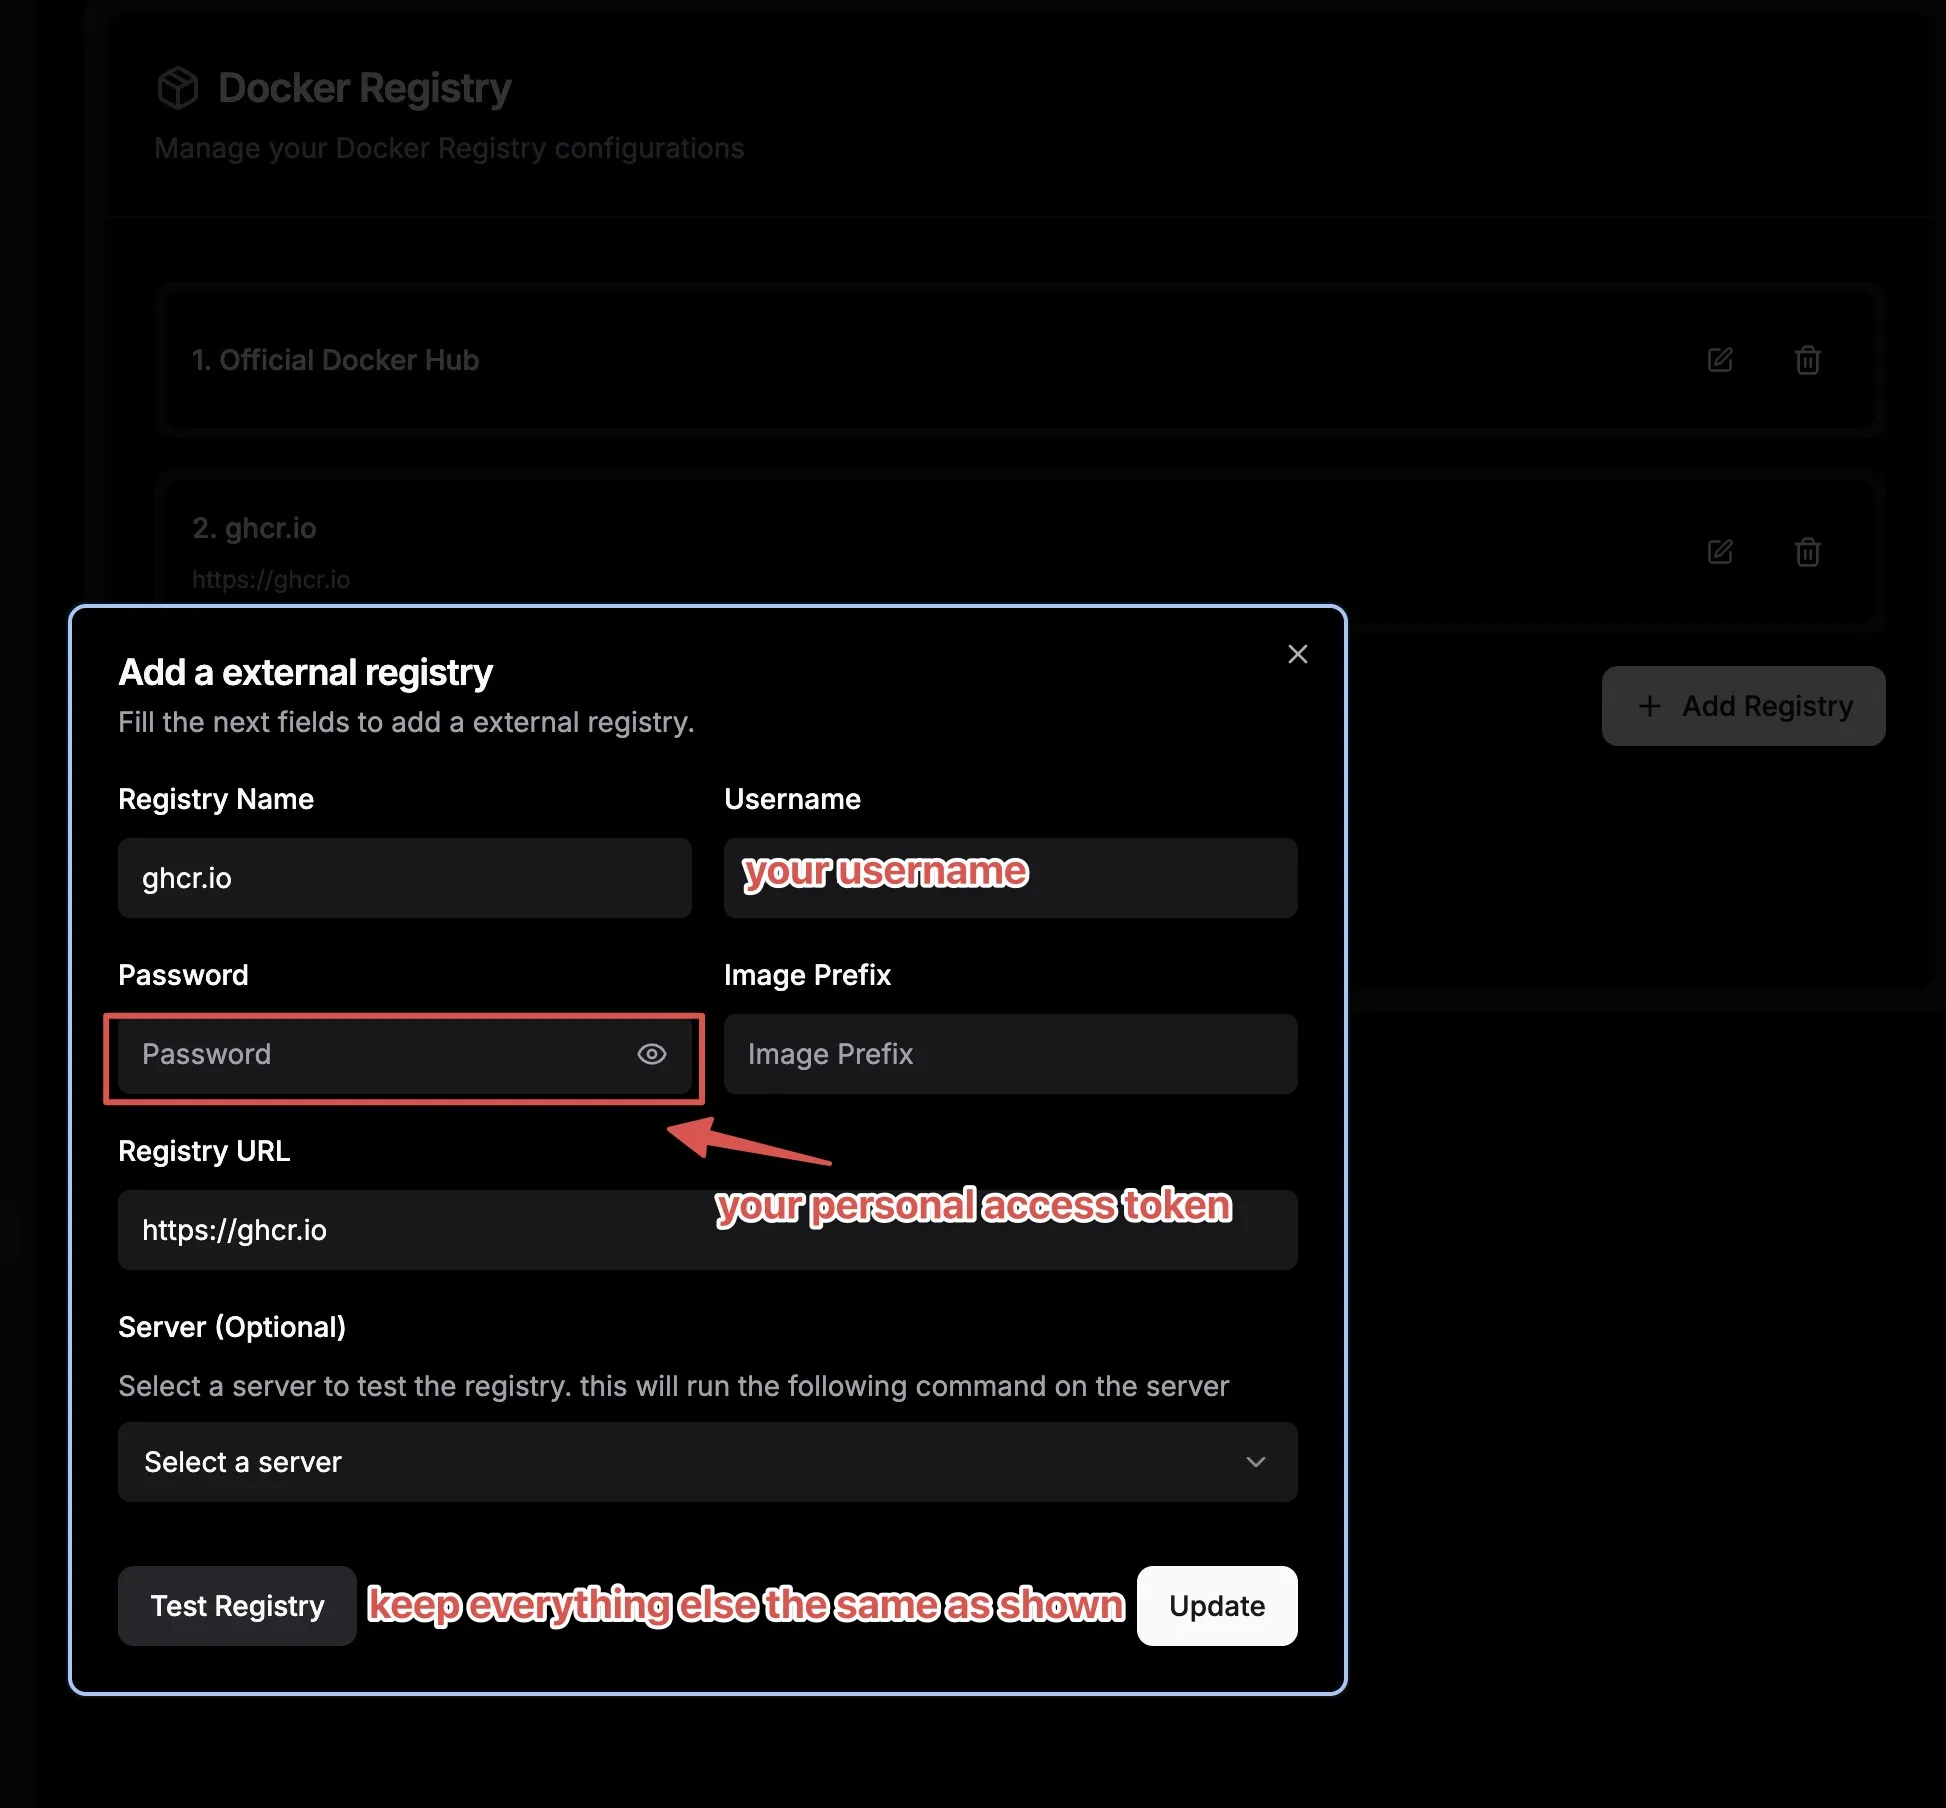
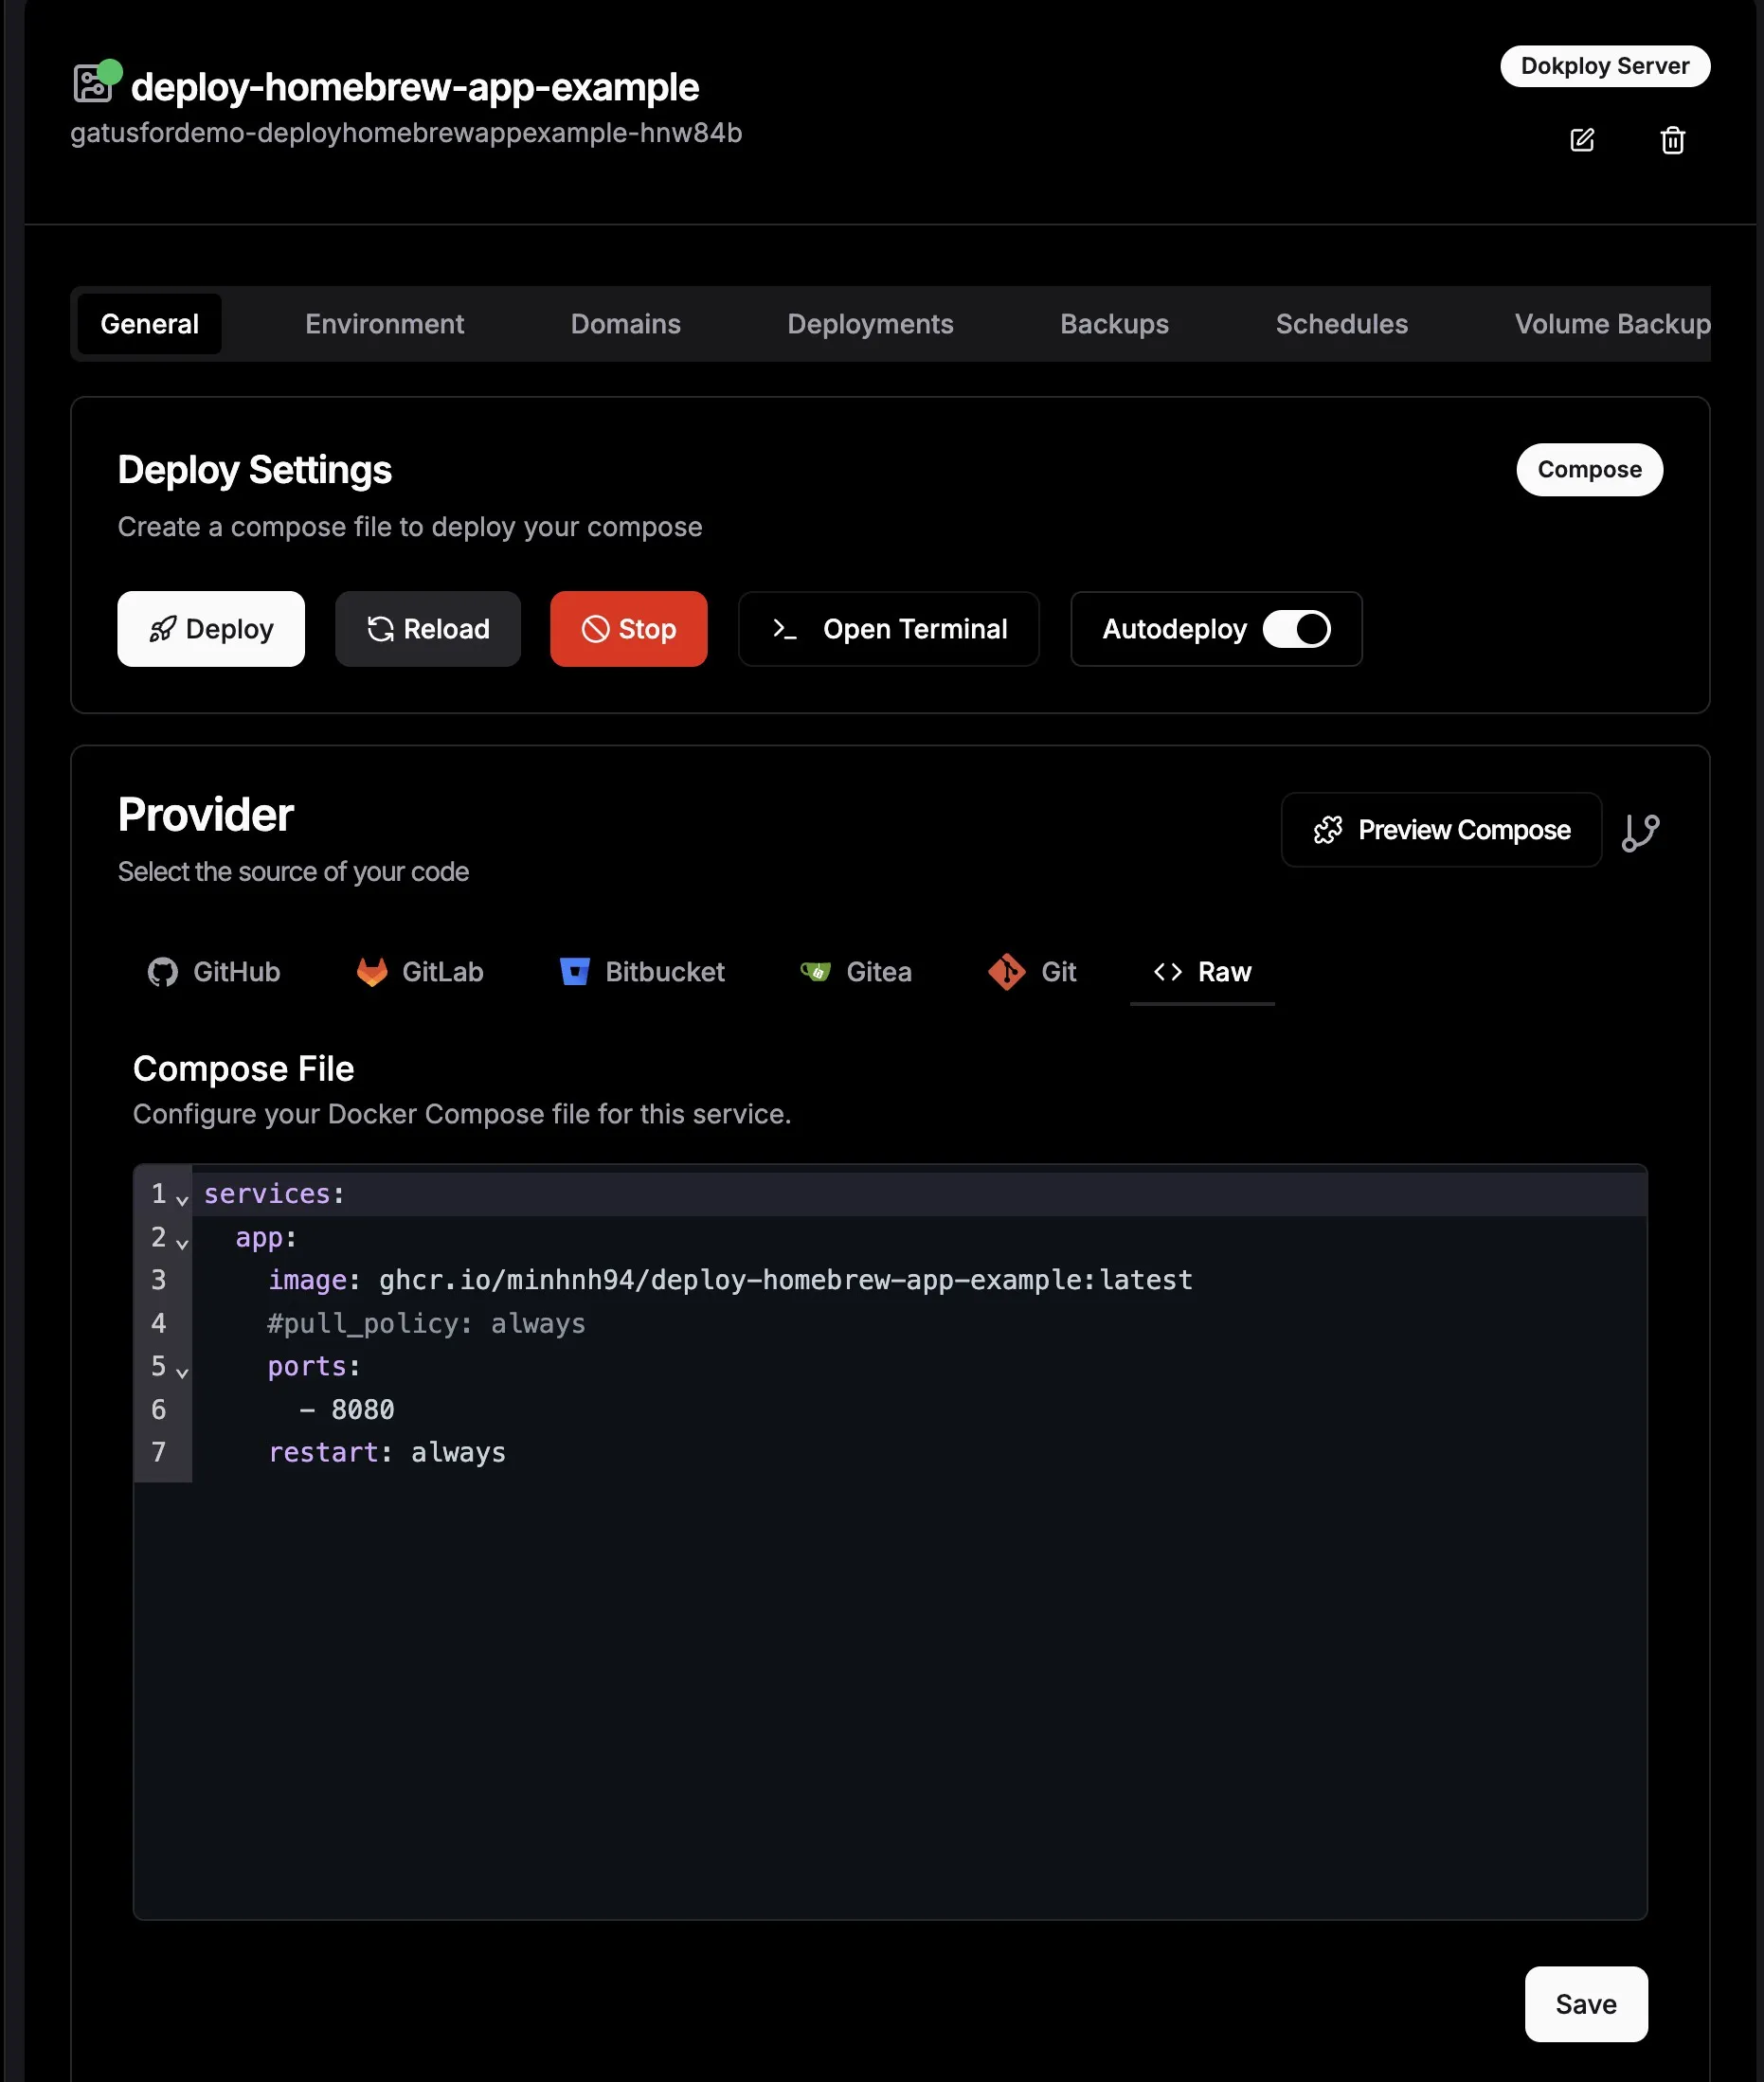
docker push ghcr.io/<YOUR_GITHUB_USERNAME>/deploy-homebrew-app-example:latestNow that your image has been pushed to your Github registry with the tag latest, we will be using it in another Dokploy Composer application. First you will need to add the registry with your credentials to Dokploy so it can pull from Github registry (assuming that you don’t make the image public access).
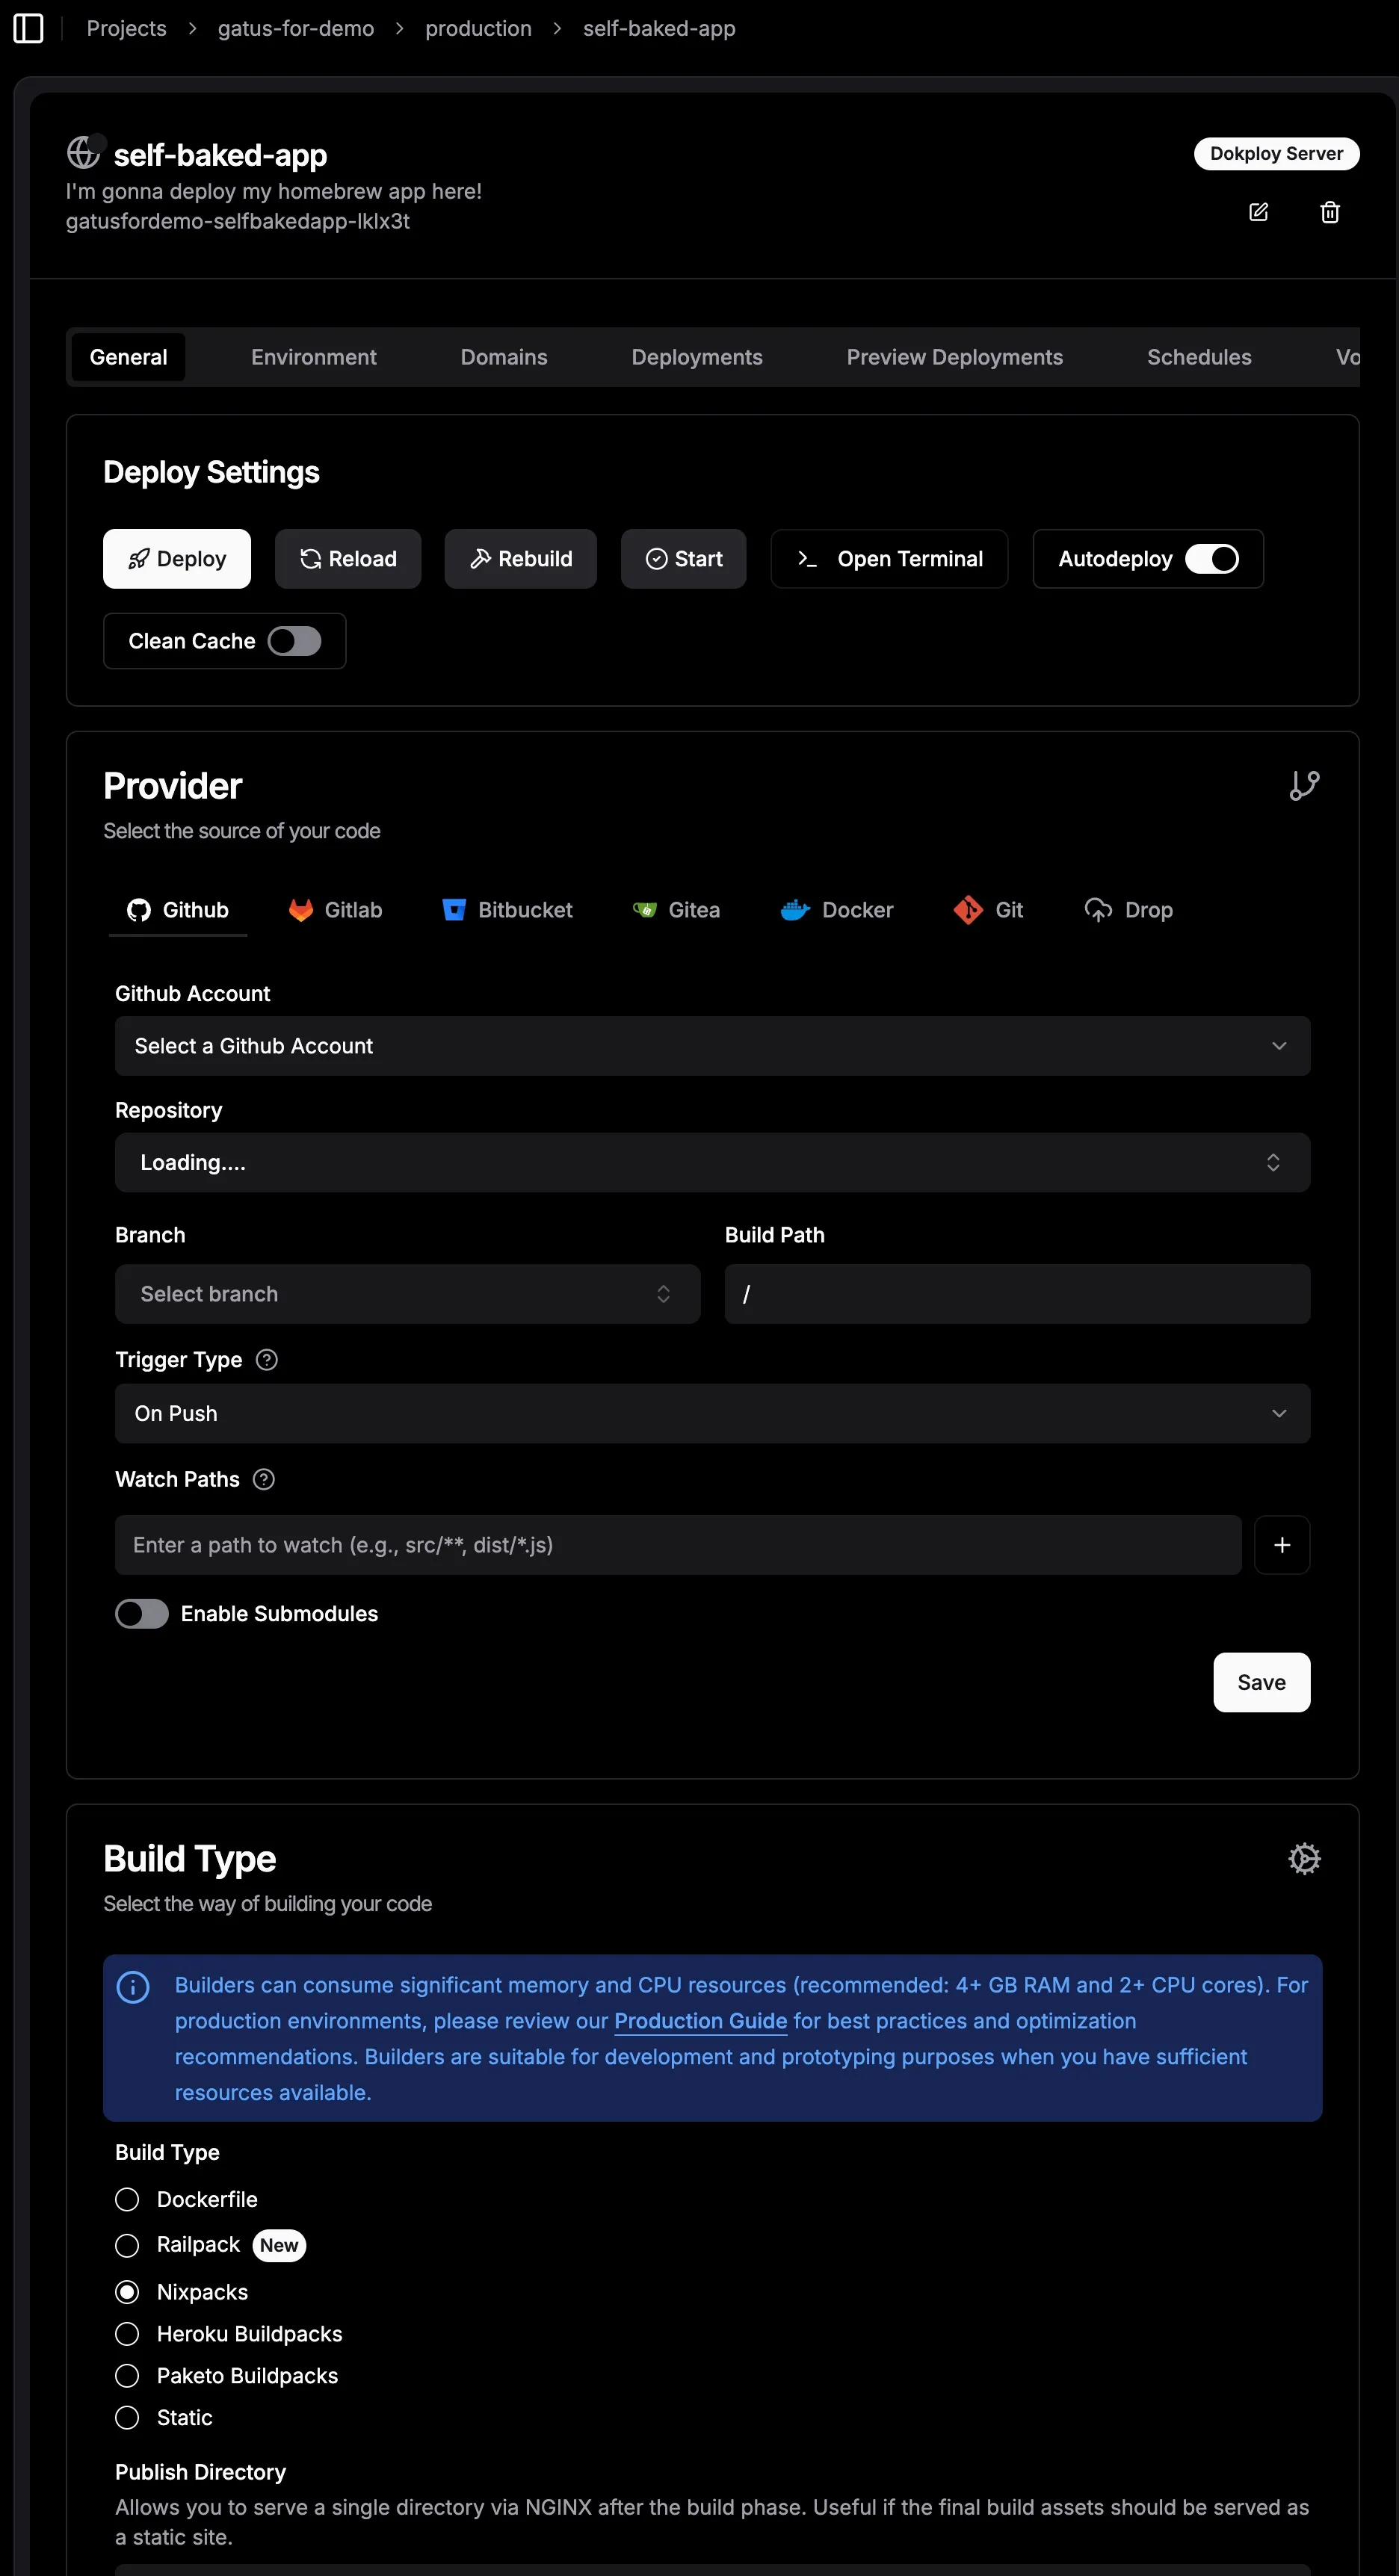
Next is to create a Compose Service to pull the image and deploy it. The steps will be similar to the “Self hosting a Dockerized application” section above so I will show the screenshot of the Composer editor only here:
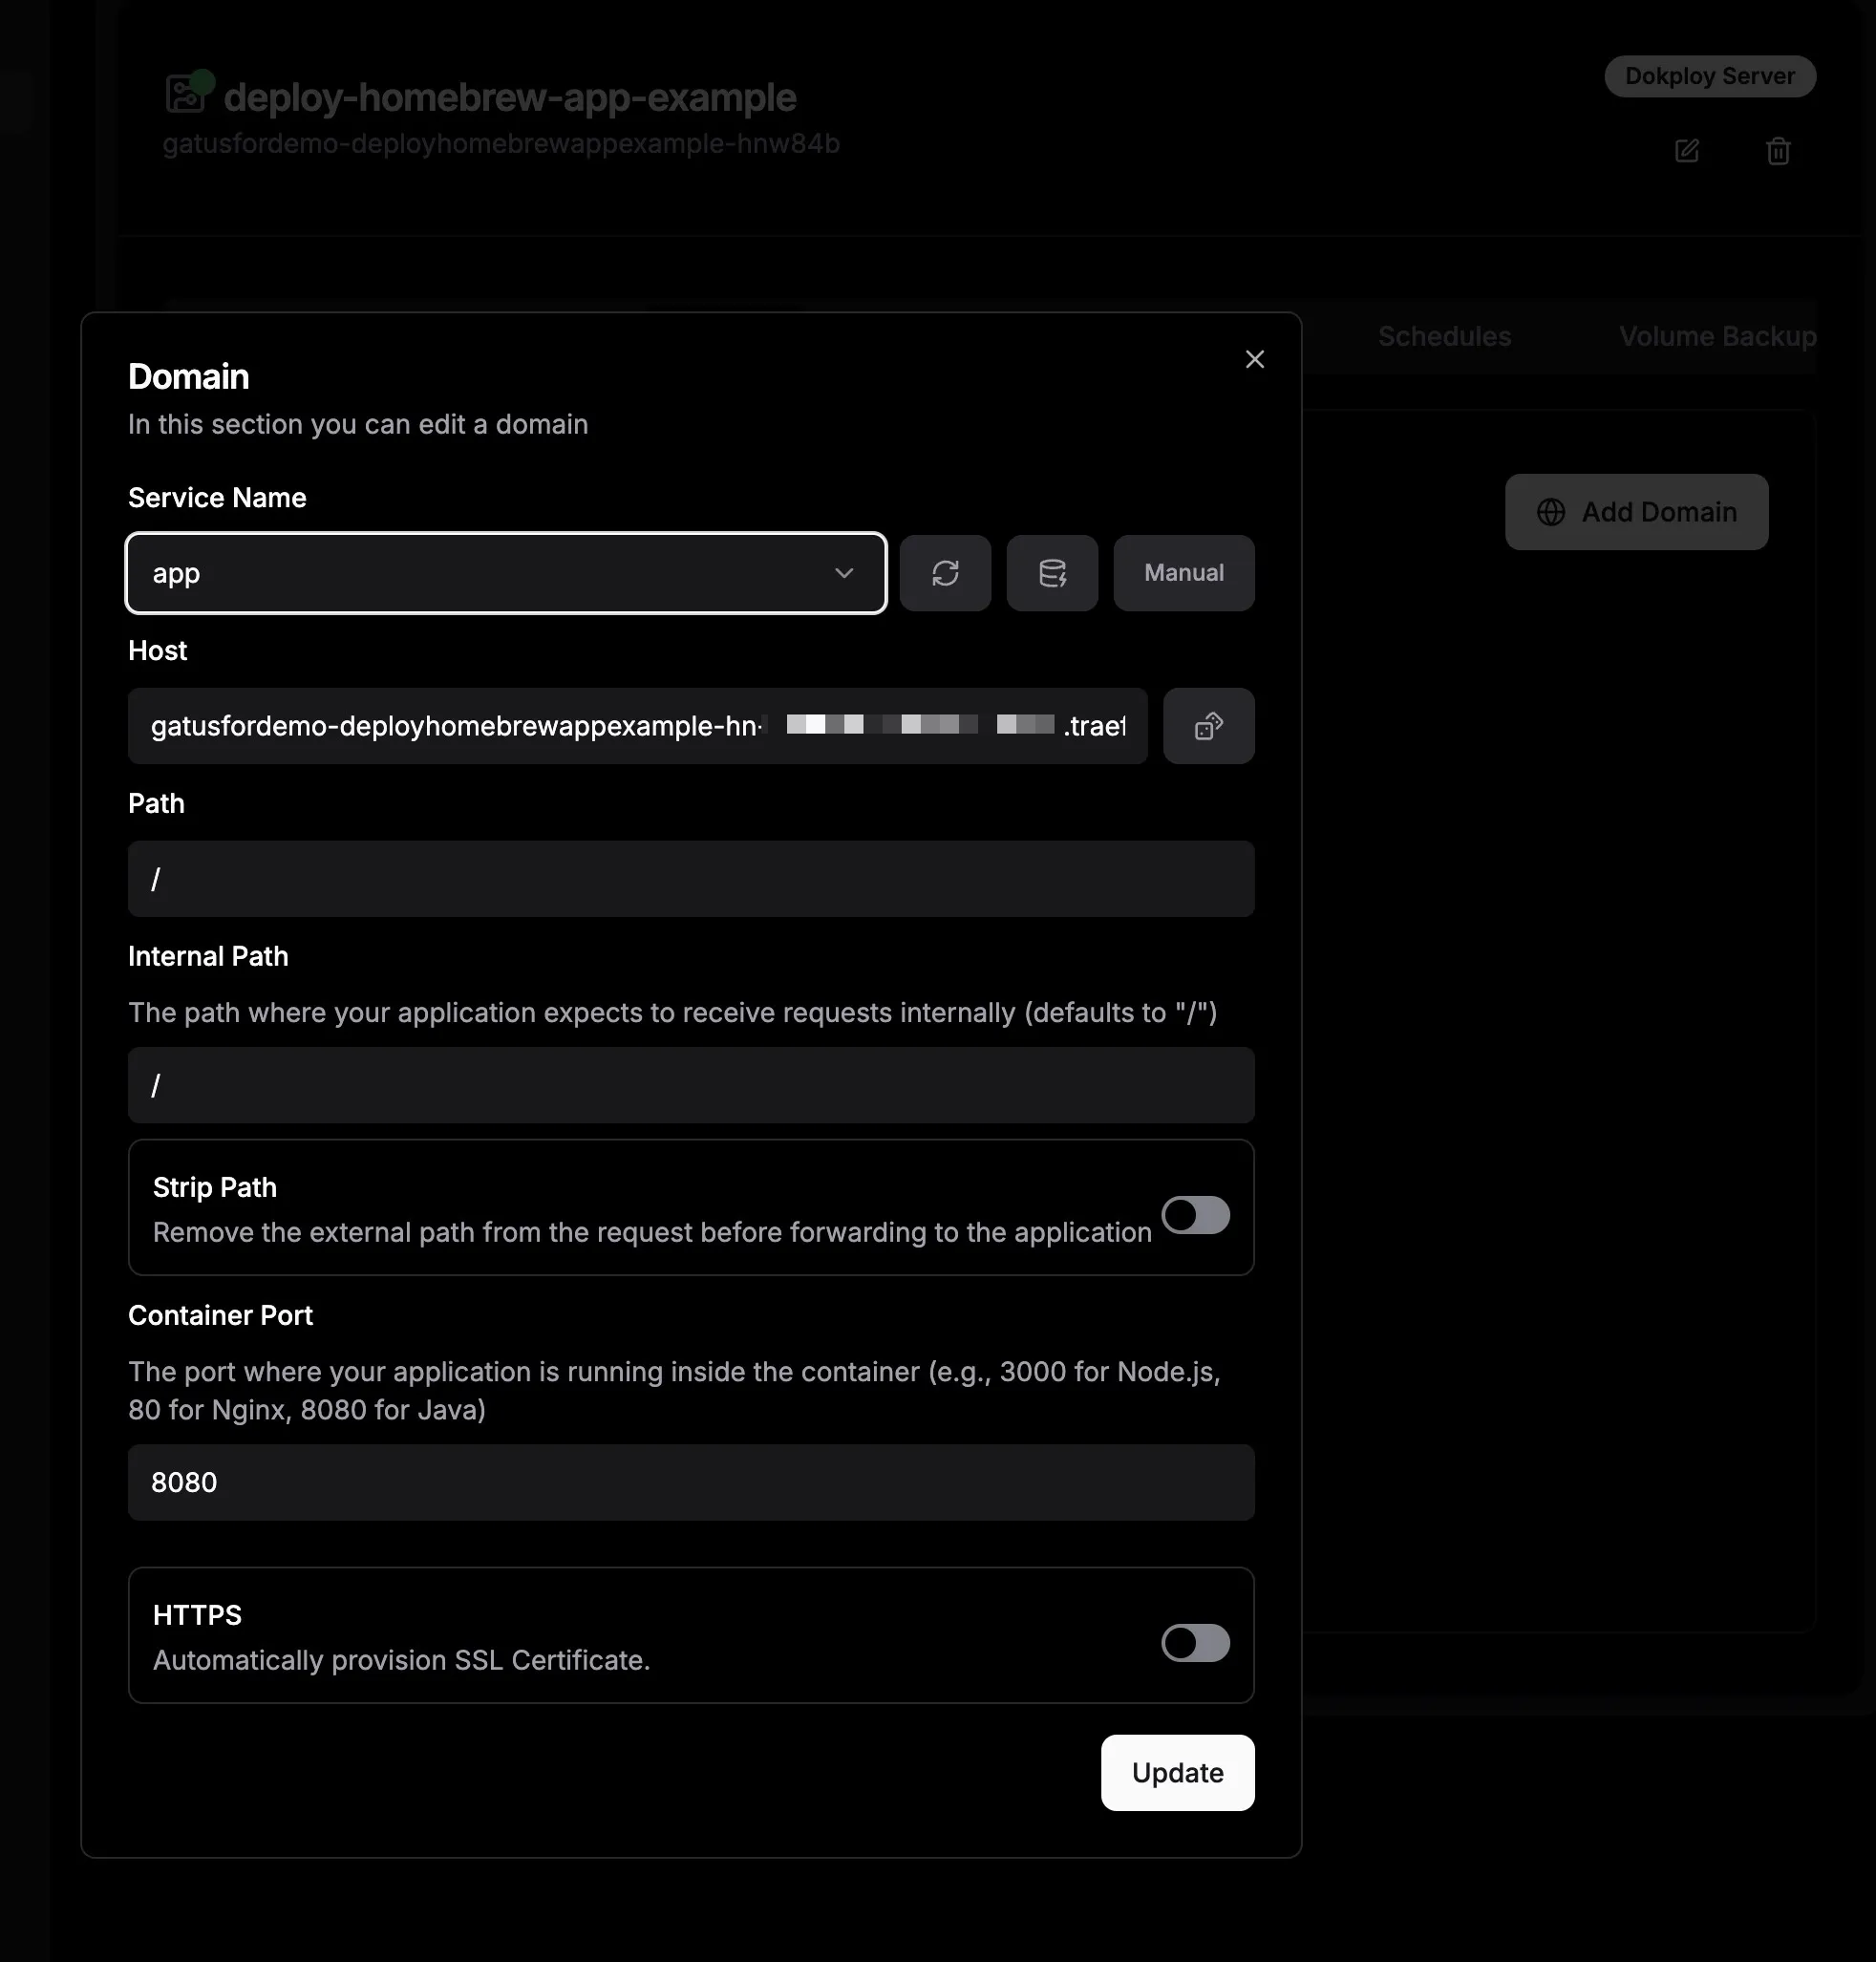
The final step to make your app accessible is to create a record in Dokploy’s Domains tab and point it to our service. You can use traefik.me if you don’t own a domain or use your custom domain/subdomain for this.
Your app should now be accessible on the internet! 🎉

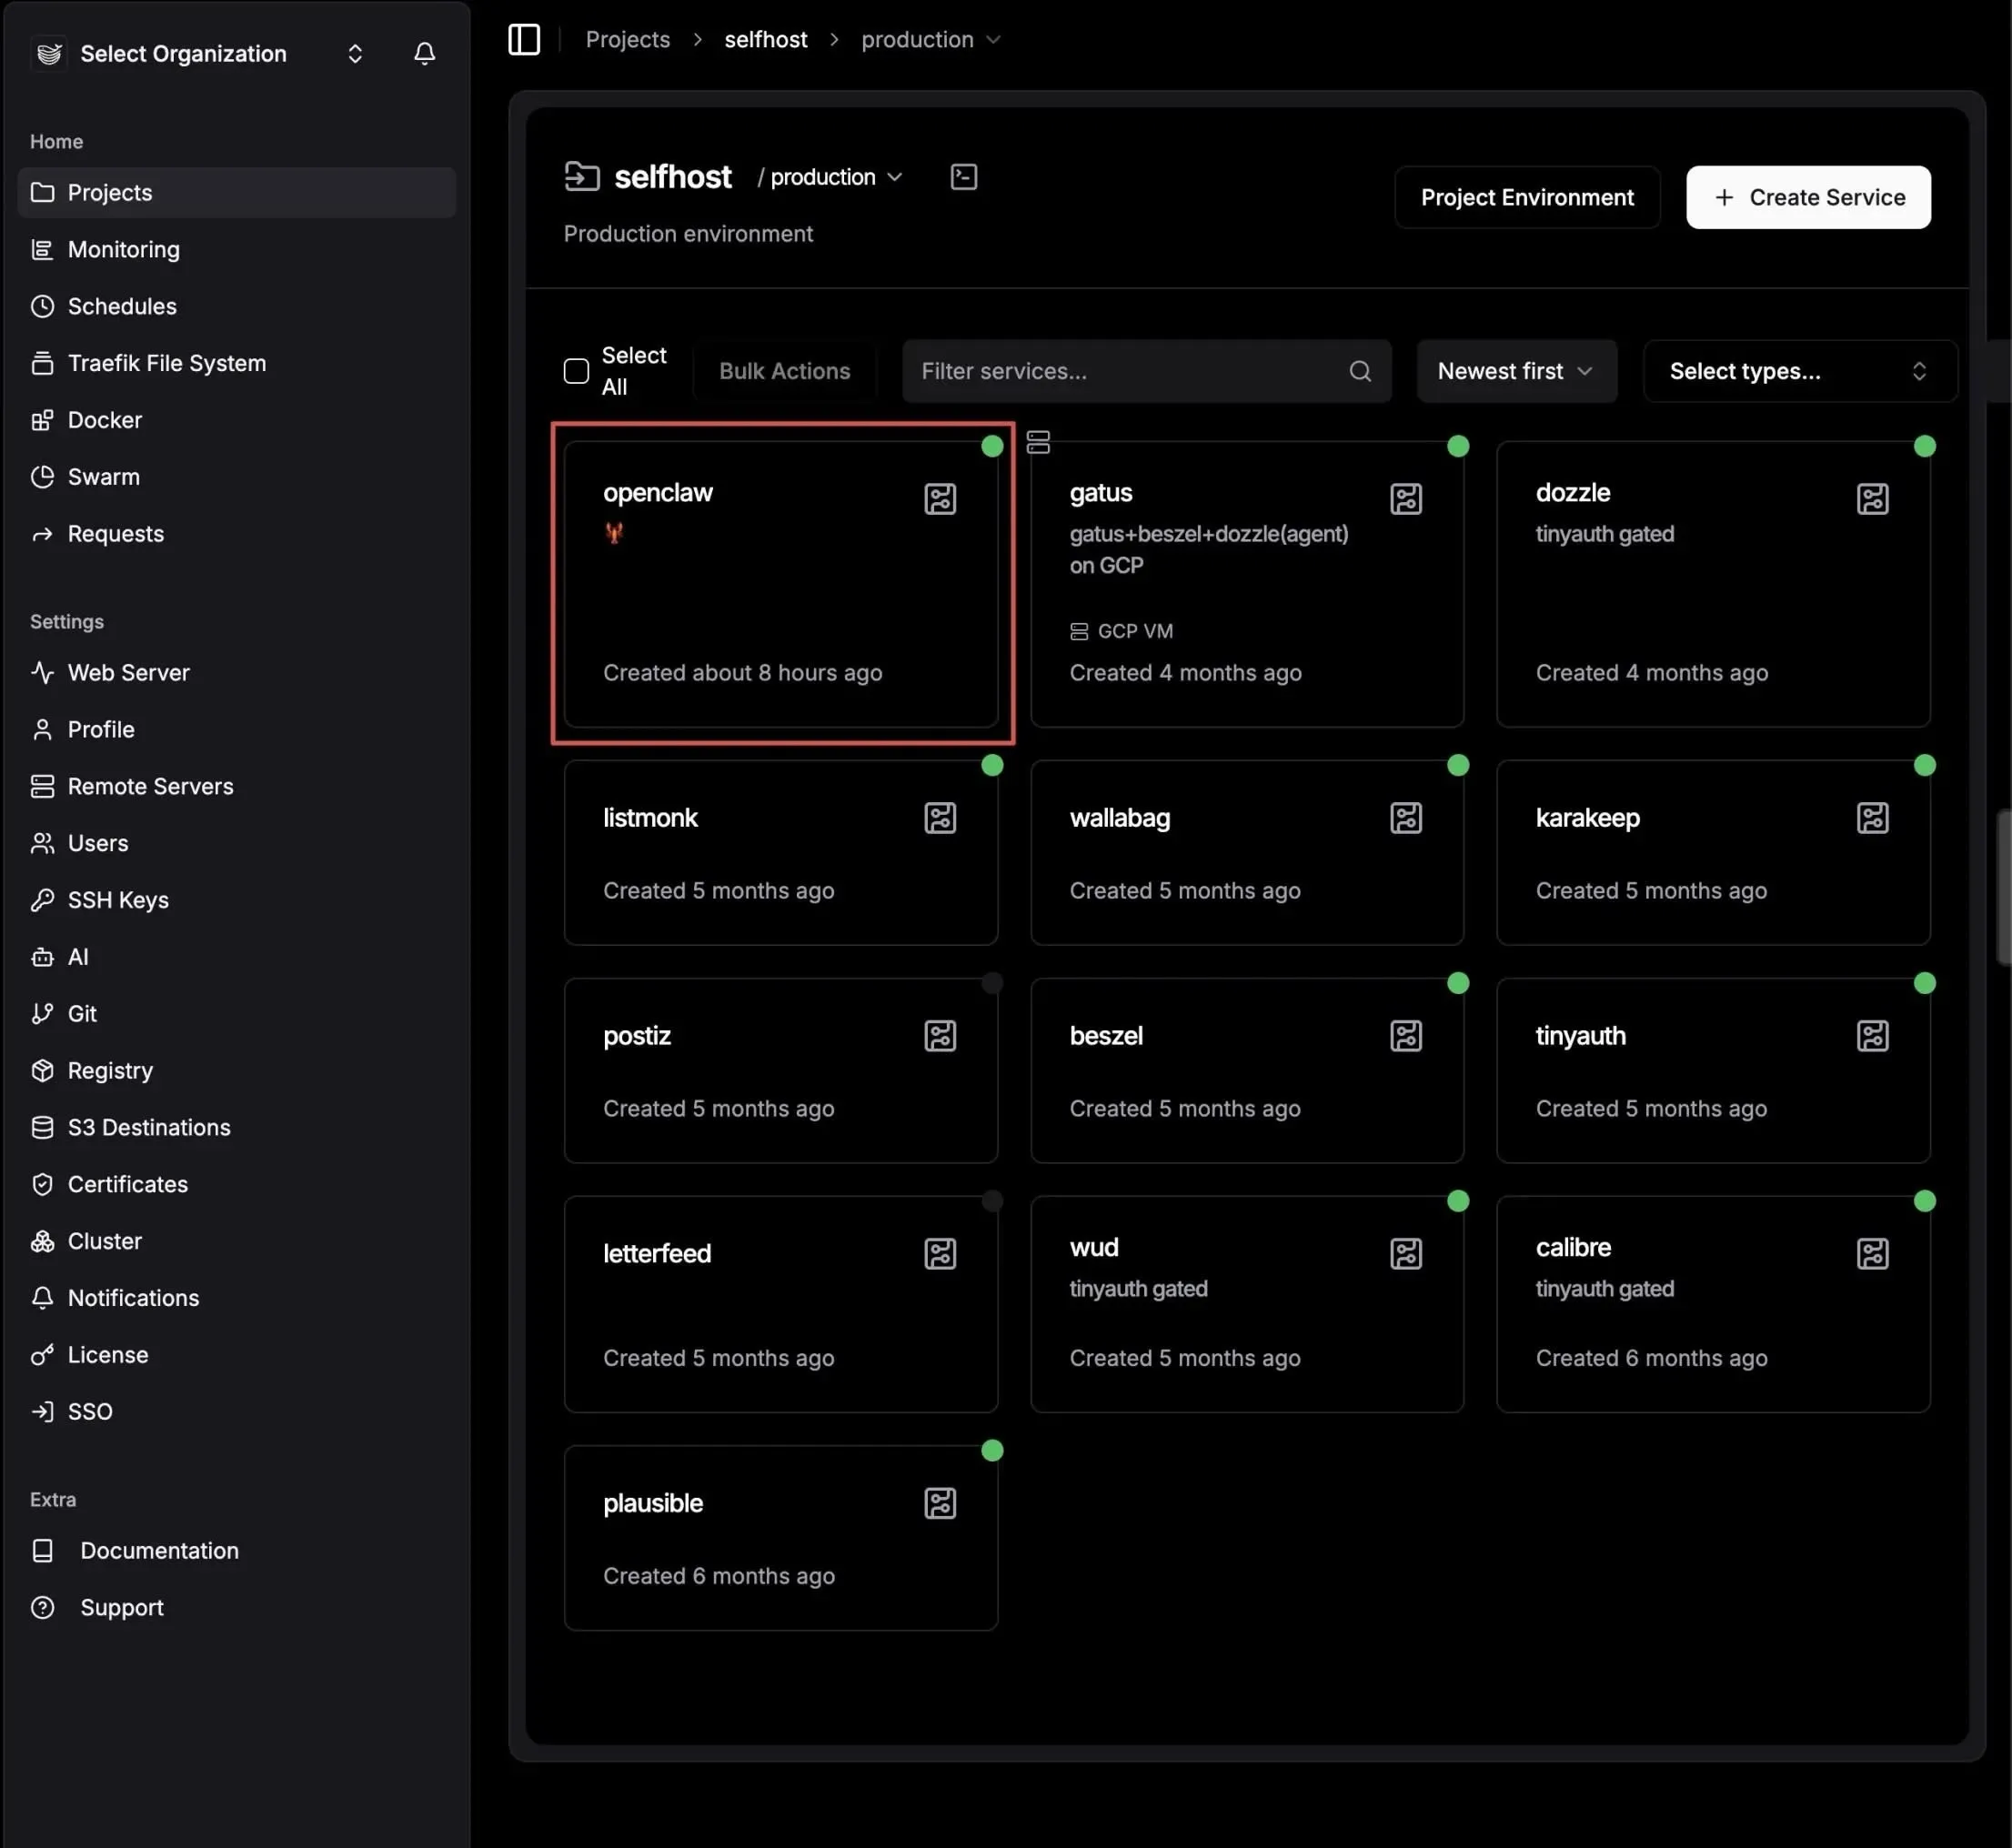
Hosting OpenClaw on Dokploy
Want your own always-on AI sidekick without paying SaaS tax? Host OpenClaw on the same Dokploy box. It’s just Docker + env vars. No wizardry.
Create a new Compose service in Dokploy and paste:
services:
  # Only for first time setup, you can comment out after setup is done
  # Without this part, openclaw would fail to create its own workspace because mounted volumes require root privilege
  openclaw-perms:
     image: alpine/openclaw:latest
     user: "0:0"
     volumes:
       - openclaw_data:/home/node/.openclaw
       - exec_folder:/usr/local/bin
     command: ["sh", "-lc", "mkdir -p /home/node/.openclaw && chown -R 1000:1000 /home/node/.openclaw"]
     restart: "no"

  openclaw-gateway:
    image: alpine/openclaw:latest
    environment:
      HOME: /home/node
      TERM: xterm-256color
      OPENCLAW_GATEWAY_TOKEN: ${OPENCLAW_GATEWAY_TOKEN}
      CLAUDE_AI_SESSION_KEY: ${CLAUDE_AI_SESSION_KEY}
      CLAUDE_WEB_SESSION_KEY: ${CLAUDE_WEB_SESSION_KEY}
      CLAUDE_WEB_COOKIE: ${CLAUDE_WEB_COOKIE}
    volumes:
      - openclaw_data:/home/node/.openclaw
      - exec_folder:/usr/local/bin
    ports:
      - "18789"
      - "18790"
    init: true
    restart: unless-stopped
    command:
      [
        "node",
        "dist/index.js",
        "gateway",
        "--bind",
        "auto",
        "--port",
        "18789",
        "--allow-unconfigured",
      ]

volumes:
  openclaw_data: {}
  exec_folder: {}
The openclaw-perms service is there to fix volume permissions (mounted Docker volumes default to root, and OpenClaw runs as uid 1000). Deploy once with it, then comment it back out and redeploy. Skip this and you’ll stare at permission errors wondering what you did wrong.
Set your env vars in Dokploy’s environment section — don’t hardcode secrets in the compose file. The OPENCLAW_GATEWAY_TOKEN is your admin key to the gateway control UI. The Claude keys are for your AI provider sessions.
Port 18789 on http is the control UI. Add a domain in the Domains tab pointing to 18789, enable HTTPS, and you’re live. Lock it down with Tinyauth or Cloudflare Access unless you enjoy strangers configuring your AI.
The openclaw_data volume is your brain. Everything OpenClaw remembers lives there. Back it up or accept the consequences.
Okay now container’s up and running. Almost there — one last thing. SSH into your VPS, exec into the container, and run the onboarding wizard. This is where OpenClaw sets up its workspace and walks you through connecting your channels, models, and all that good stuff.
# SSH into your VPS, then hop into the container
docker exec -it <your-openclaw-container> bash

# Inside the container, run the onboard script
cd /app
node dist/index.js onboard
Follow the prompts, fill in your details, and that’s it. You’re done. OpenClaw is live on your own hardware, running on your own terms. Go talk to it.
If you already survived setting up Dokploy, this part is easy. OpenClaw is just another container — except this one talks back.
Backups
Let me be real with you: most self-hosters skip this until they lose something. Don’t be that person. Dokploy has backup features baked in — use them.
There are two things you need to back up:
- Dokploy itself — your project configs, services, environment variables, settings
- Your app data — databases and persistent volumes
They’re different problems. Don’t confuse them.
What Dokploy backs up (and what it doesn’t)
Dokploy stores its own config in a Postgres database on your server. Your projects, services, environment variables, deploy settings, domains — all of it lives there. If your VPS explodes and you didn’t back that up, you’re rebuilding from scratch.
Your app data — think: your Ghost posts, your Plausible analytics, your Gitea repos — lives in Docker volumes. That’s a separate backup concern.
Dokploy handles both, but you set them up separately.
Connect S3-compatible storage first
Before any backup is useful, you need somewhere to send it. Dokploy supports any S3-compatible provider:
- Cloudflare R2 — free egress, cheap storage, great choice
- Backblaze B2 — solid and cheap, well-supported
- MinIO — self-hosted if you’re feeling spicy
- AWS S3 — works obviously, costs more
Setup is a few clicks in Settings > S3 Providers. You paste in your bucket name, endpoint, region, access key, and secret. That’s it. You can add multiple providers if you want redundancy or separate buckets per app.
[Screenshot: Dokploy Settings > S3 Providers — showing the “Add S3 Provider” form with fields for bucket, endpoint, region, and credentials]
Back up Dokploy’s own database
This is the most important backup you’ll set up. Go to Settings > Backups (or the backup section in your Dokploy dashboard). You’ll see an option to schedule automated backups of Dokploy’s internal Postgres database.
Pick your S3 provider, set a schedule (daily at minimum — hourly if you’re paranoid), and set a retention count so you’re not drowning in old files.
[Screenshot: Dokploy Settings > Backups — schedule config, S3 provider dropdown, and retention settings]
This backup contains everything about your Dokploy setup: projects, services, environment variables, domain configs, deploy history. Lose this without a backup and you’re manually reconstructing every service from memory. You don’t want that.
Back up your app volumes
Each service in Dokploy can have its own volume backup configured. Go into a service, find the Backups tab, and you can schedule volume snapshots to your S3 bucket.
[Screenshot: Dokploy service detail page > Backups tab — showing volume backup schedule and S3 provider selection]
For databases specifically (Postgres, MySQL, MariaDB, MongoDB), Dokploy does a proper database dump rather than a raw volume copy — so you get a clean, restorable backup, not just a snapshot of potentially mid-write binary files.
Set up a backup for every service that holds state you care about. If your service is stateless (no volume, just a Docker image), you can skip it — the Dokploy config backup is enough to redeploy it.
Retention policy
Don’t just dump infinite backups into your bucket. In the backup config, set a retention count — something like keep the last 7 daily backups. Old ones get automatically purged. This keeps your storage bill from quietly creeping up while also giving you a meaningful recovery window.
For critical databases you might want 30 days. For lower-stakes services, 7 is fine. Use your judgment.
Restore workflow
When things go sideways (and eventually they will), here’s how you get back:
Restoring Dokploy config: If your server dies completely, spin up a fresh VPS, install Dokploy, then go to Settings > Backups and restore from your S3 backup. Dokploy will pull the backup and restore your entire project/service configuration. You’ll still need to re-attach your domains and verify your env vars are correct, but everything is there.
[Screenshot: Dokploy Backups > Restore — showing the restore-from-S3 option and backup file list]
Restoring a volume or database: Go to the service, hit the Backups tab, pick the backup you want, and hit restore. Dokploy handles the download and injection. For databases, it runs the dump back in — done.
Actually test your restores
This is the part everyone skips and then cries about later. A backup you’ve never tested is a rumor, not a backup.
Spin up a staging service, point it at a backup, and verify it works. Do this at least once when you set things up. Then do it again after a major change. The five minutes it takes is nothing compared to the panic of realizing your “backup” was misconfigured the whole time.
Backup that works = good sleep. Backup you’ve never tested = anxiety waiting to happen.
Done right, your backup setup looks like this: Dokploy config backing up daily to R2, each stateful service backing up on its own schedule, retention set so you don’t hemorrhage money, and at least one successful restore test in your history. That’s the whole thing. Not complicated, just needs to actually be set up.
Additional fluff you might find useful
Do yourself a favor and install Tailscale on your VPS instance. Seriously, this is one of those tools that feels optional until you try it once. Tailscale gives you a private, encrypted network between your laptop, phone, and VPS without opening extra ports or messing with scary firewall rules. SSH becomes dead simple, you can access internal dashboards without exposing them to the public internet, and it just works across networks. For a broke noob setup, it’s basically free magic.
Expose services running inside your VPS using Cloudflare Tunnel. If you’re allergic to opening ports or want to keep things extra locked down, Cloudflare Tunnel is your friend. It lets you expose a local service (like an admin panel or internal app) through Cloudflare without your VPS having any public-facing port at all. Combine this with Cloudflare Access and you get auth, HTTPS, and protection for free. This is especially nice for stuff you don’t want indexed by Google or randomly poked by bots. If you haven’t known yet, most self-hosted services can be hosted this way using Cloudflare Tunnel, though it does come with some limitations (you can’t stream media for example).
Dozzle, Beszel, Tinyauth. These are small quality-of-life tools that make self-hosting feel less like sysadmin hell. Dozzle gives you a clean web UI for Docker logs so you’re not constantly tailing logs in the terminal. Beszel helps you keep an eye on server resources without going full Prometheus-brain. Tinyauth is great for quickly slapping basic auth in front of internal tools. None of these are mandatory, but once you add a few, you’ll wonder how you lived without them.
r/selfhosted This subreddit is both a goldmine and a productivity trap. You’ll discover cool projects, weird setups, and people running 200 services on a Raspberry Pi for no good reason. It’s great for inspiration, troubleshooting ideas, and discovering tools you didn’t even know existed. Just be warned: it’s very easy to go from “I’ll just host one app” to “why am I running my own mail server”.
openalternative.co Think of this as a map from SaaS products to things you can self-host. Every time you see a paid tool and think “there has to be a free version of this”, openalternative is usually right. Not everything there is production-ready, but it’s an excellent way to explore options and slowly replace paid services with stuff running on your own VPS.
That’s it. You don’t need all of this on day one. Start small, break things, learn just enough Linux to be dangerous, and enjoy the feeling of owning your stack again. Just like I have done. Never thought I would enjoy tending my own digital garden this much 😉